This post may contain affiliate links, which means I may earn a small commission from purchased products at no additional cost to you. See my full disclosure here.
Contents:
- What It’s Like To Use Canva For Creating Content
- How To Design Social Media Content In Canva
- Choose What Type Of Design You Want To Make
- Push Buttons
- Tools To Look Out For
- Key Alterations To Note
- Start With A Canva Template Or Build From Scratch
- Make Necessary Adjustments
- Get It Onto Social Media!
- Give Yourself Time To Learn!
One of the biggest buzzwords in content creation these days is “Canva.” And for good reason, too. Canva is one of the most powerful tools you can have in your arsenal for building and maintaining both your online and in-person presence. If you’re endeavoring to build and improve your Facebook page, TikTok profile, or any of your accounts on other social media platforms, you can easily design social media content in Canva that looks good, doesn’t break the bank, and takes minimal time.
The best part? No graphic design degree is needed!
The other best part? You can get a Canva Pro account for free if you’re a registered nonprofit (which most churches are).
The other other best part? I’m here to help make it easier for you to design social media graphics that pop. Let’s dive in.
What Is It Like To Use Canva For Creating Content?
Canva is one of the more user-friendly tools available to the average person. With a wealth of design elements available for use, a wide variety of premade templates to choose from, and simple integration with your social media accounts, using Canva is one of the easiest ways to simplify your social media strategy and make content that can be used on a variety of social media platforms.
I’m not a graphic designer. I’ve never taken a course on how to make content. The extent of my training has involved joining groups on Facebook that relate to creating content for beginners and an occasional Google search. My main teacher has been experience. I use social media. I consume content. I see what is popular. I pay attention to what grabs my attention. I keep myself aware of what makes an impact on my brain and what performs well on social media and I use it to influence what I create.
If you aren’t tech-savvy, there’s going to be a learning curve. But the curve for Canva is nowhere near as steep as many other things you’ve learned. With a little time, practice, and curiosity, creating content in Canva can come to you easily.
Take heart – you’re not going to break Canva. You’ll never reach a limit for how many times you can scrap a project and try again. You can’t screw up. You can just learn and adapt.
If you’re a beginner starting out, I’m here to help walk with you and make it easier to dip your toe into the world of graphic design for social media posts made simple through Canva.
If you don’t have an account already, go ahead and get that started. All you need is an email address. You can even go a little further right away by starting the process to Apply for Canva Nonprofits.
How To Design Social Media Content In Canva
1. Choose What Type Of Design You Want to Make
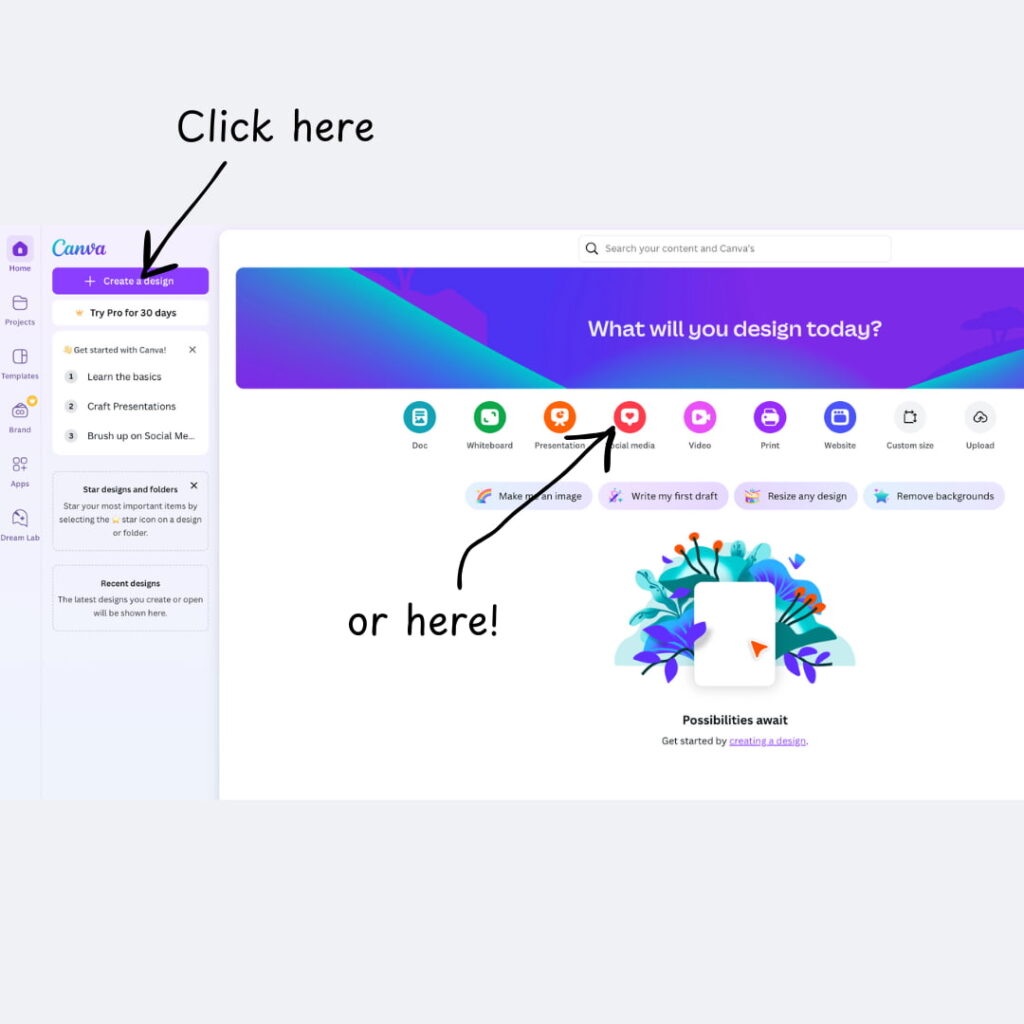
Are you wanting to make a Facebook Post? Instagram Story? TikTok Clip? Something Else? Decide what you want to make, then click “Create a Design” or use one of the quick keys at the top of the home page. Canva will make some suggestions of templates you can use, or you can just select the type of post you plan to make and Canva will immediately take you to a blank canvas that has the perfect dimensions for whatever type of social media post you’re trying to make. For the purpose of this blog post and the accompanying images, we’re going to pick a Facebook post.
If you want to make a design in multiple sizes, don’t worry – just pick one to start. You can easily resize it later to other sizes appropriate for other social media platforms (or even for a screen in your sanctuary or an image in your bulletin!).
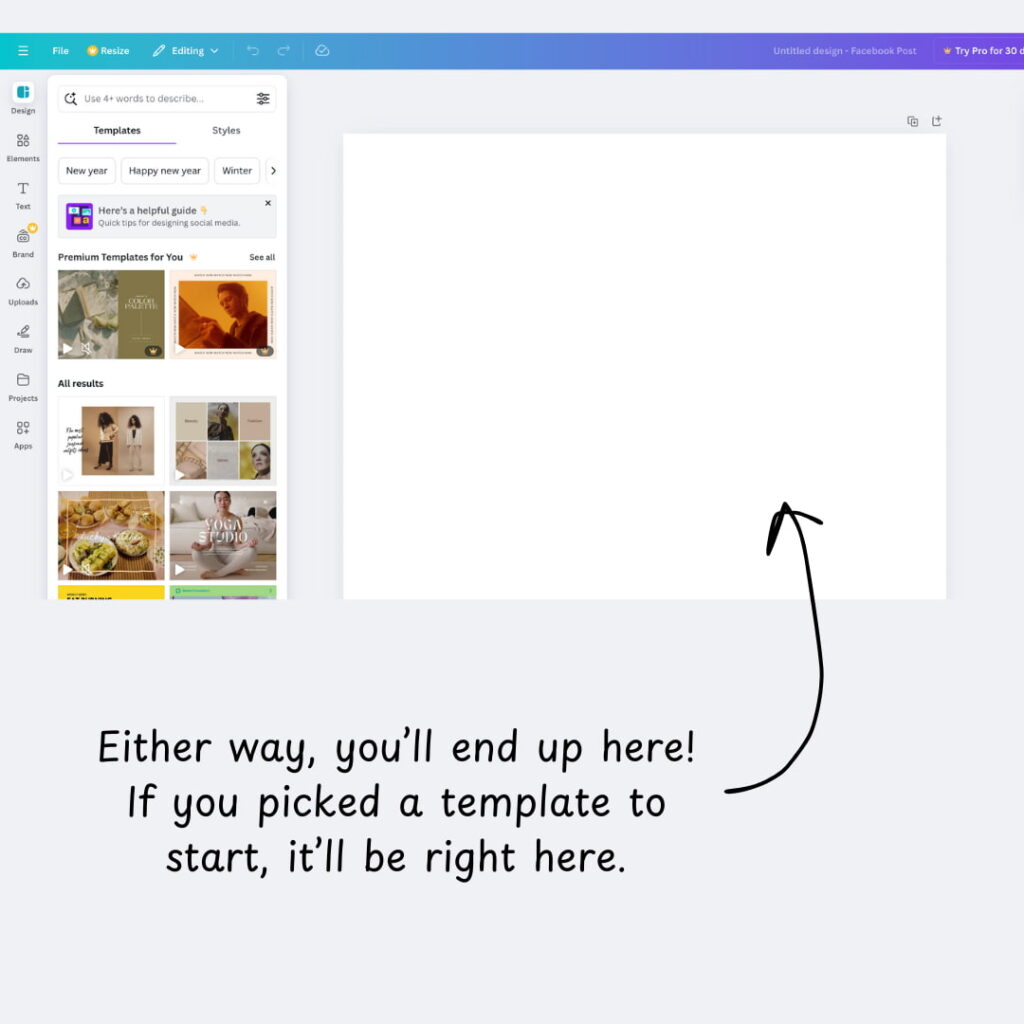
It may seem confusing to be able to start making a new design in multiple ways, but ultimately they all take you to the same spot for creation.

2. Push Buttons
Before even making your first design, familiarize yourself with some of the buttons you’ll be dealing with in Canva! There are a lot of things you can do, and you can’t break the program, so have fun playing around before getting too serious!
Tools To Look Out For:
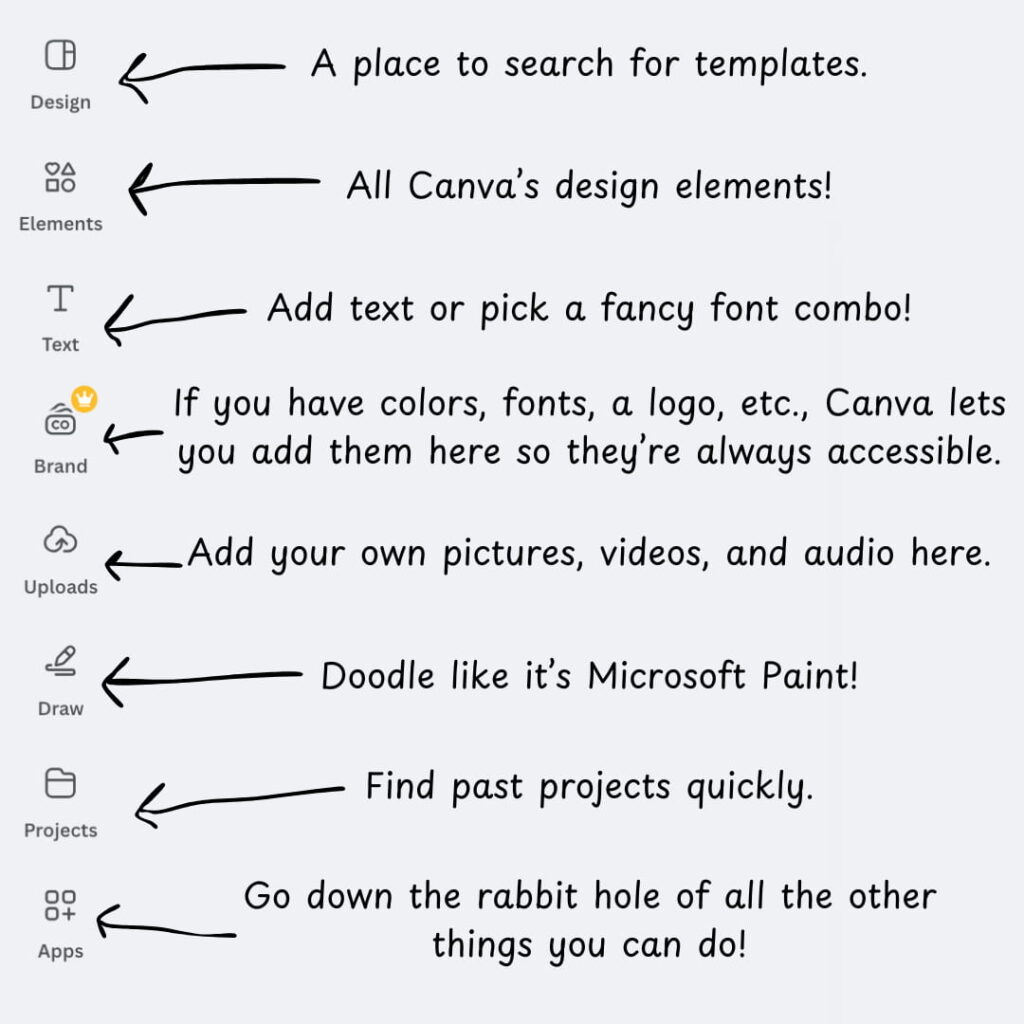
- Design: This is where Canva will start you when you open a fresh design. Here, you’ll find all of the templates that are optimized for the dimensions you have or the type of design you chose. Feel free to scroll through. You’ll also see a “styles” button where you can change all of the text or colors with one click.
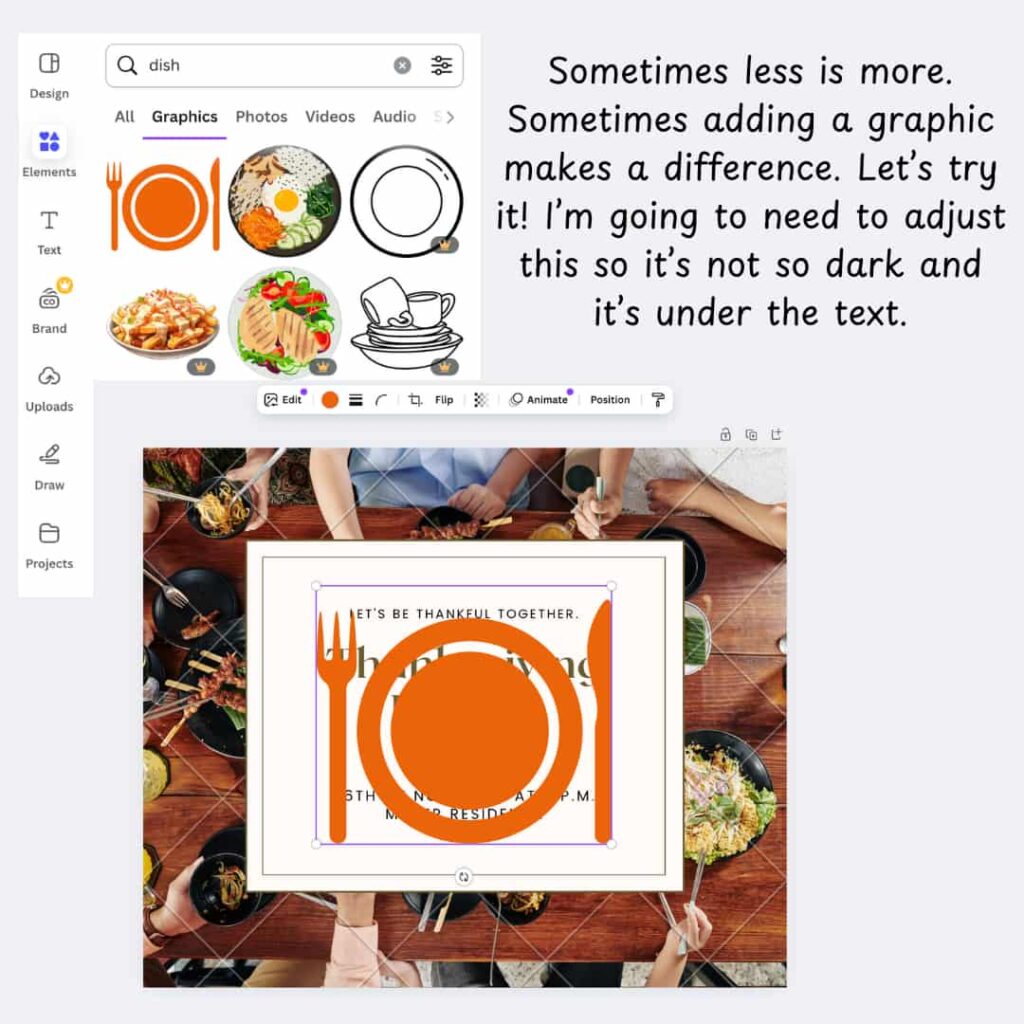
- Elements: One of the most important parts of Canva. This holds all of the design elements that you have access to – clip art (called “graphics”), basic shapes, photos, frames, videos, charts, audio, etc. If there’s something you’d like to add to your design, Canva probably has it here.
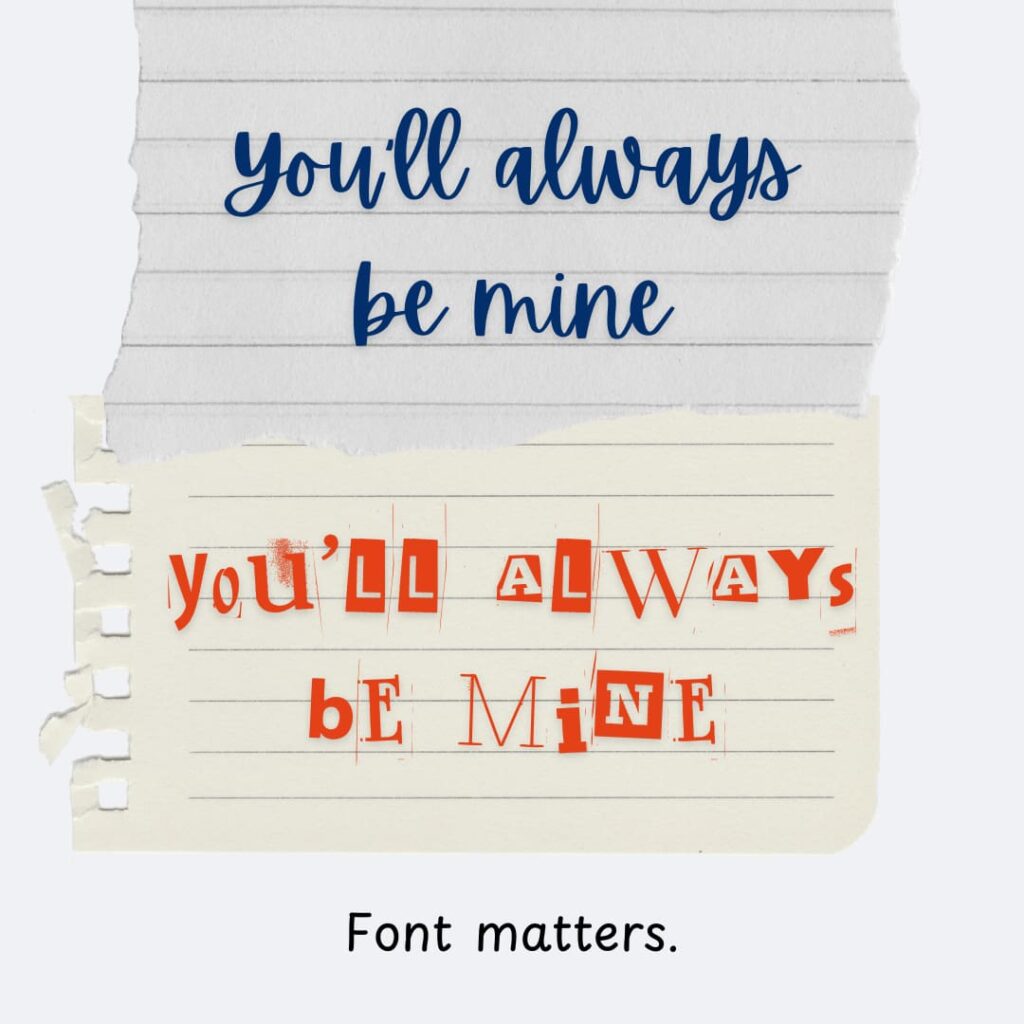
- Text: Great images and great fonts go hand-in-hand. Canva offers a huge selection of fonts, and they even have some “Font Combinations” to choose from. (Remember – font matters. It’s okay to spend time finding one that mirrors the message you’re sending!)
- Brand: You don’t really need to worry about this one when you’re starting out. If your church has set colors they always use or a logo or fonts, you can create a cohesive “Brand” in Canva. But this is more advanced than where we are now!
- Uploads: If you have pictures or something that you want to use, you can upload them to Canva to be used in your design! You can upload images from the internet here, too, but please use images that are not yours responsibly! Don’t do an image search then take something to use in your design without permission!
- Draw: Personally, I use this mostly to draw arrows if I can’t find an arrow element pointing “just right.” However, you can party like it’s the 1999 version of Microsoft Paint and doodle to your heart’s content!
- Apps: Canva has SO MUCH more it can do. Mockups, QR codes, AI Image generators, translations, the list goes on and on. Again, this is probably more than you’re looking for starting out, but as you get comfortable with Canva, you can check out what else this powerful tool can do!
When you add elements to your design, whether they’re text, shapes, images, videos, etc., a bar appears at the top with options of ways you can alter that element. Feel free to play around with what each of these buttons does! If you don’t like it, you can always hit the undo button at the top of your screen!
Key Alterations To Note:
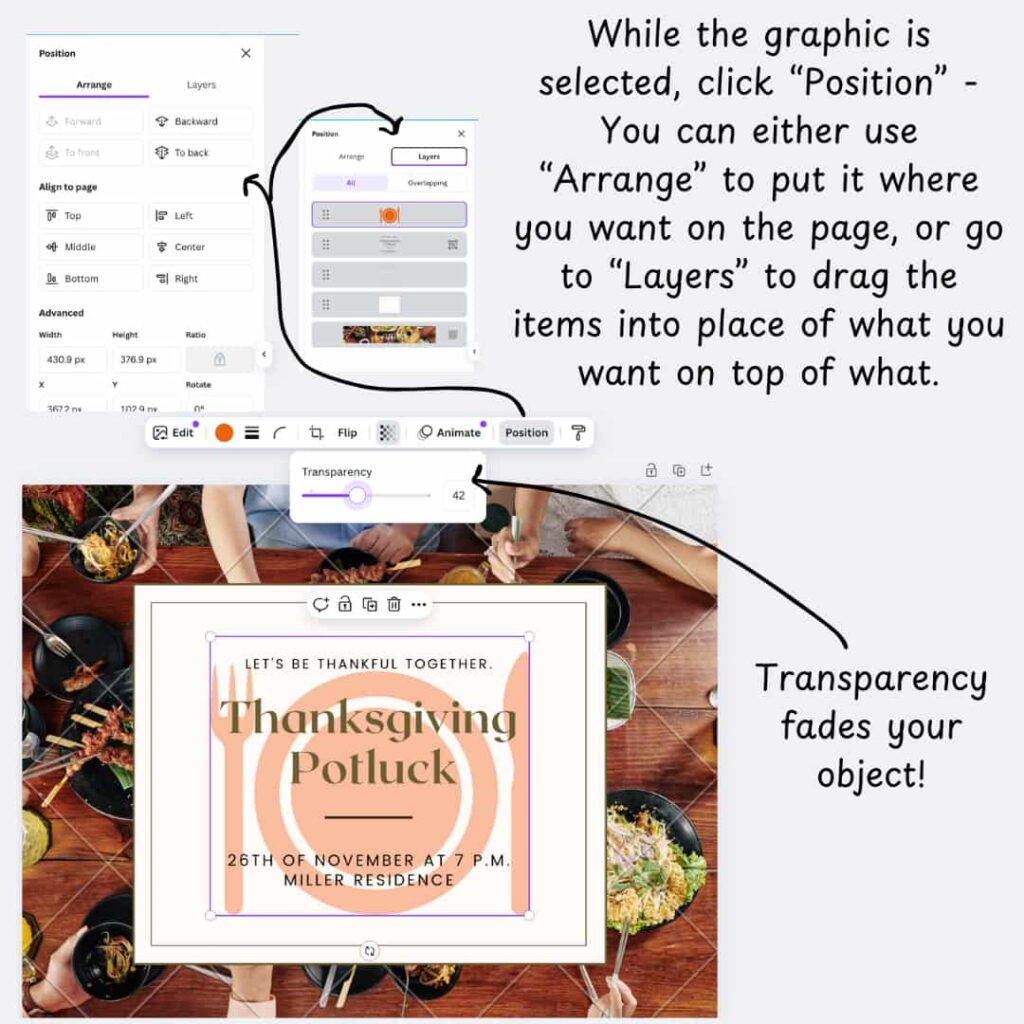
- Transparency: You can make an image more or less “faded” by adjusting its transparency. This is helpful if you want something to stand out – just fade what’s behind it a bit!
- Effects: When you have text, you can put some neat effects in there! You can put a shadow on the text, add an outline or background, curve the letters, etc. Adding an effect can make text pop or make it more readable!
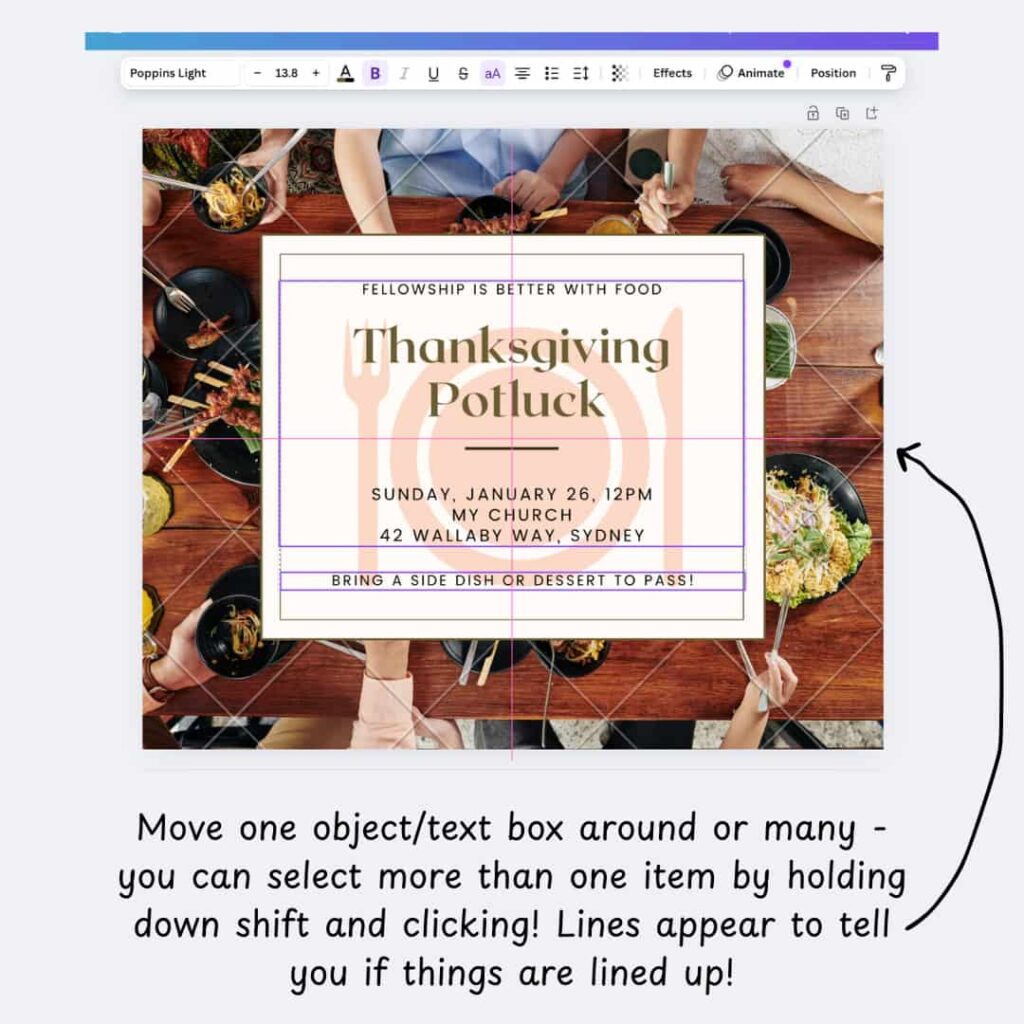
- Position: Change what is layered on top of another element. This is especially helpful when you add an image, but now it’s in front of the words you had on there. This is also where you can align items on your image. If you have more than one item selected, you can align items to each other (so if you want all the text to be in line, select it all and choose how you want it aligned and it’ll snap to it!).
- Animations: If you’re just making an image for a Facebook or Instagram post, you don’t need to add any animation. If you want to make a Facebook or Instagram story or little video, you can make things dance on your screen by adding animation! Just don’t make it like those PowerPoints we made in high school where everything is flying in from a different angle and something is spinning at 100 miles an hour, making everyone sick.

There are a lot of things you can do in Canva, and it’s worth taking the time to play around with all the options! But for now, let’s move on to making our first design – you’ll have plenty of opportunity to play with the features while in creation mode!
3. Start With A Canva Template Or Build From Scratch
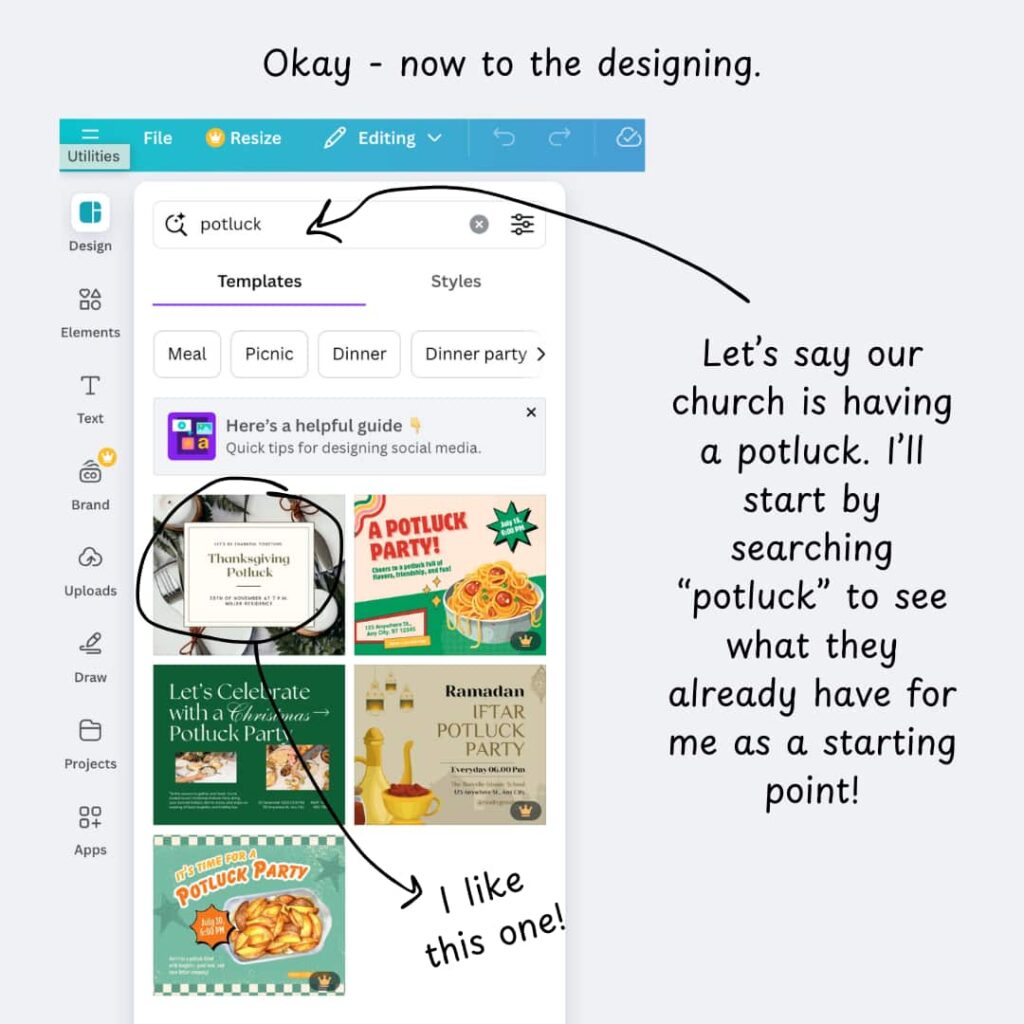
Have a potluck coming up? Need drivers for your church ministry? Special worship service? Chances are, there is a template you can use to get you started. You can search for a general “announcement” design, or you can get specific by saying what type of event you’re having or what you’re looking for.
Using a broader term for your search (like “announcement” or “event”) will get you a lot of Canva templates to pick from, but a narrower search term (like “potluck” or “drivers needed”) will probably give you something that will require less editing. You’ll have fewer options to pick from, though, so it’s possible nothing will catch your eye. It’s best to start specific and broaden out as necessary if you’re looking to save yourself time and headaches.
If you’re not going to use a template, either because you didn’t find a template that worked for you, you want to play around a little more with the various design elements, or for some other reason, there’s always the option to start from scratch! There are thousands upon millions of elements to choose from, and hundreds of text styles to pick from. If endless possibilities don’t intimidate you, go ahead and step up to the challenge! Sometimes it’s fun to go down the rabbit hole and see what you can do.
For the purpose of the accompanying images for this blog post, we’re going to pretend that we want our Facebook post to be about an upcoming All-Church Potluck.

4. Make Necessary Adjustments
Whether you’ve picked a template or started from scratch, it’s time to make the design your own. Adjust the text, colors, and images to fit your event or message. It’s okay to change fonts, colors, and images if they don’t match the “feel” you want to go for (Remember our “font matters” picture?). It can take a while to find one that feels “just right.”
A Tip Within A Tip – don’t go overboard by making everything a different font or color, or putting too much on the graphic. Less is more when it comes to graphic design!
Not all templates are created equal, either. Just because it’s a template doesn’t mean it’s perfect – if it’s too busy or too plain, you can add or remove elements. You have free reign to change a template however you want.
As you’re making your adjustments, make sure you check your spelling and event details – you don’t want to say an event is happening on Sunday, January 25 only to realize the 25th is a Saturday!
Something really nice about Canva is that it has guides to help you ensure items are lined up correctly or spaced evenly. You’ll see lines and numbers pop up to show you how things align. You also have the option in “position” to tell objects to snap to the middle or sides or change order in layering.
If you’re ever in doubt, especially as you’re starting out, don’t be afraid to share it with a friend and ask them their impressions or if they have any suggestions!
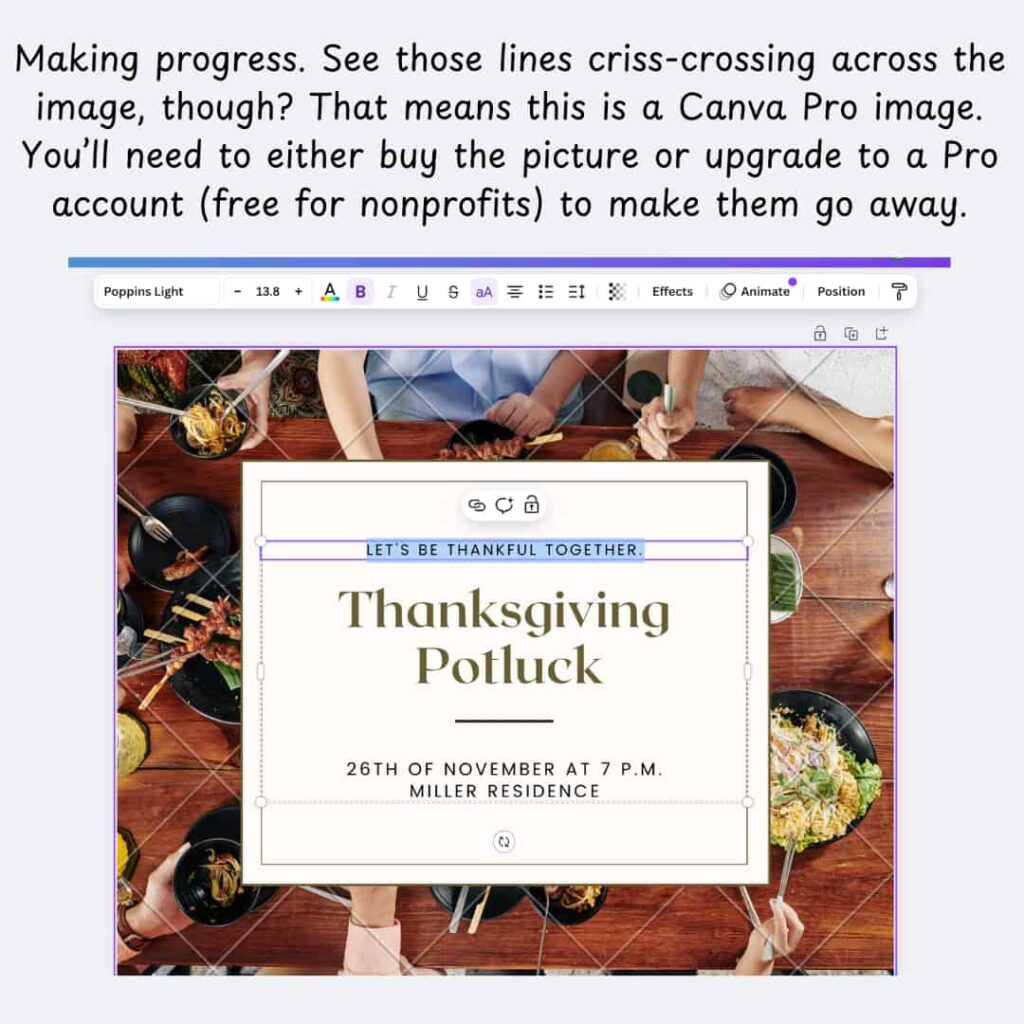
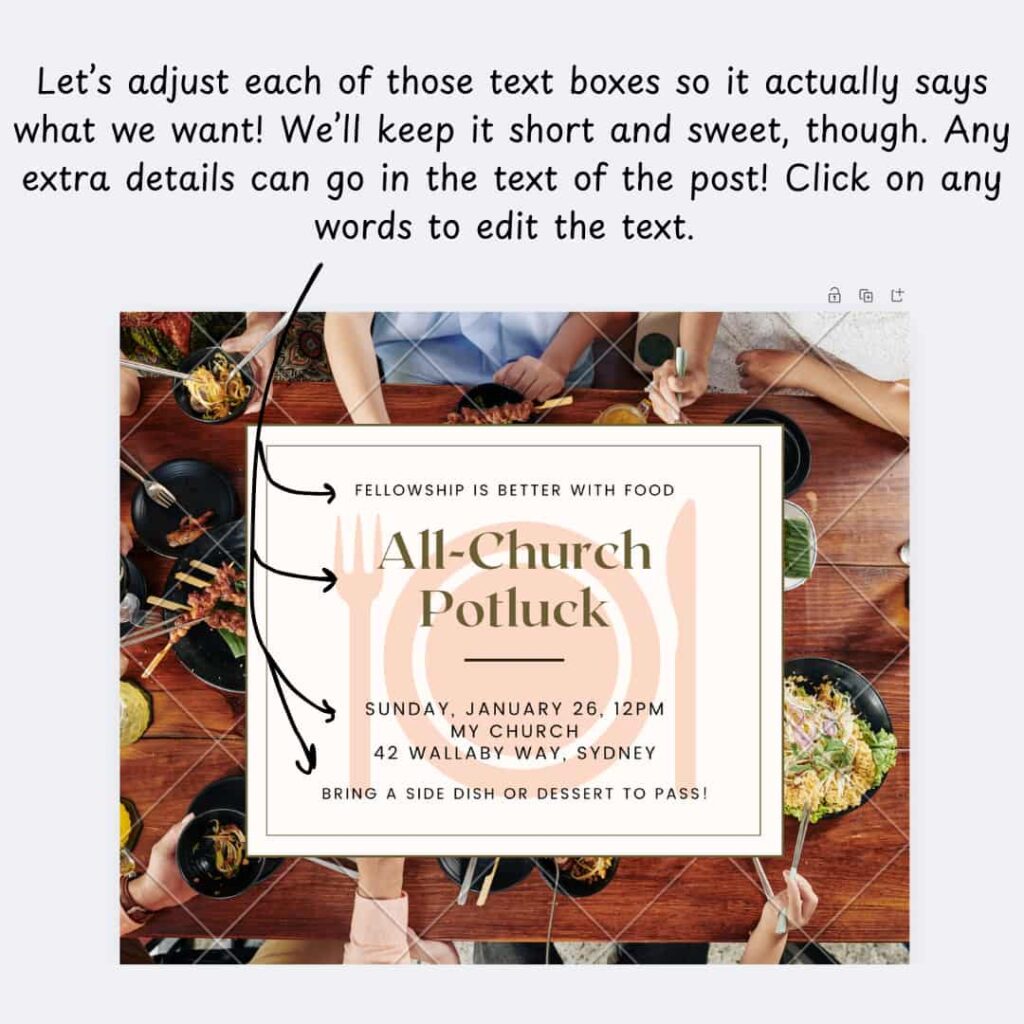
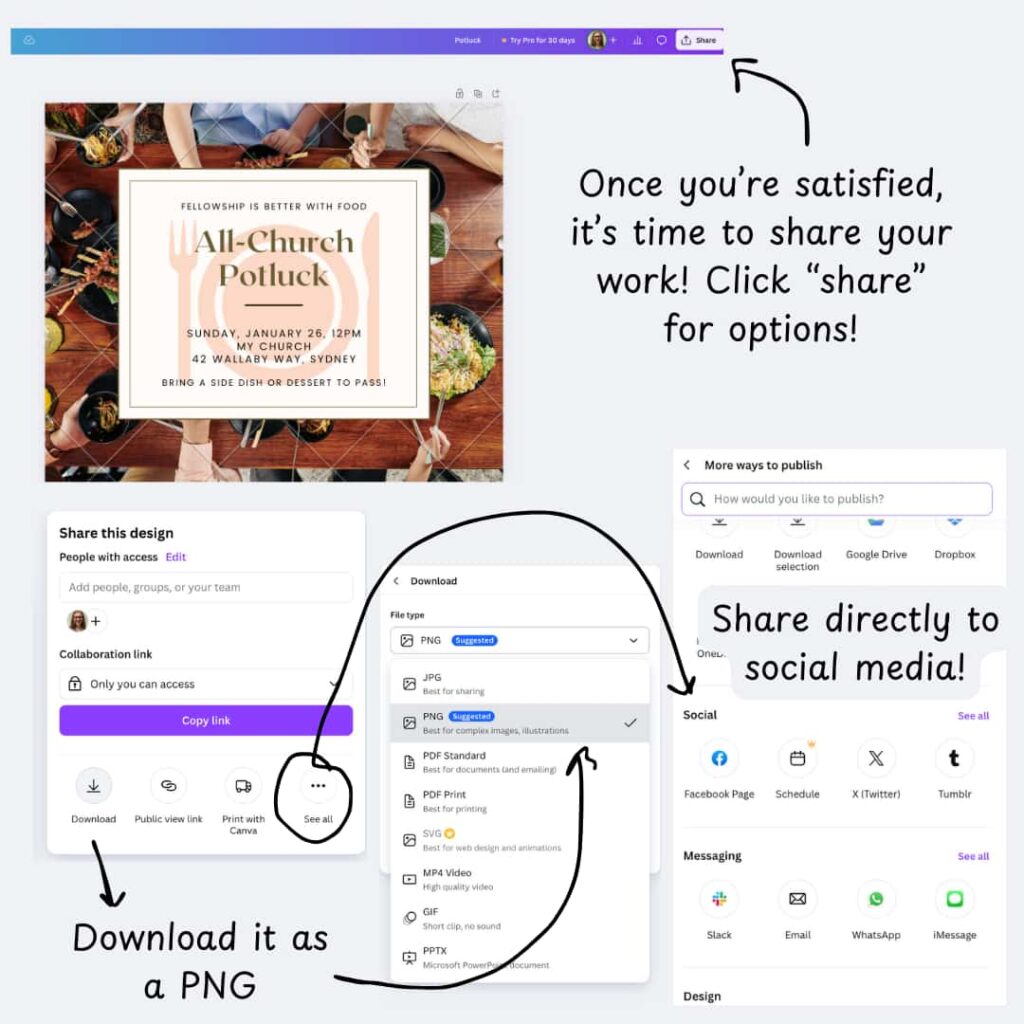
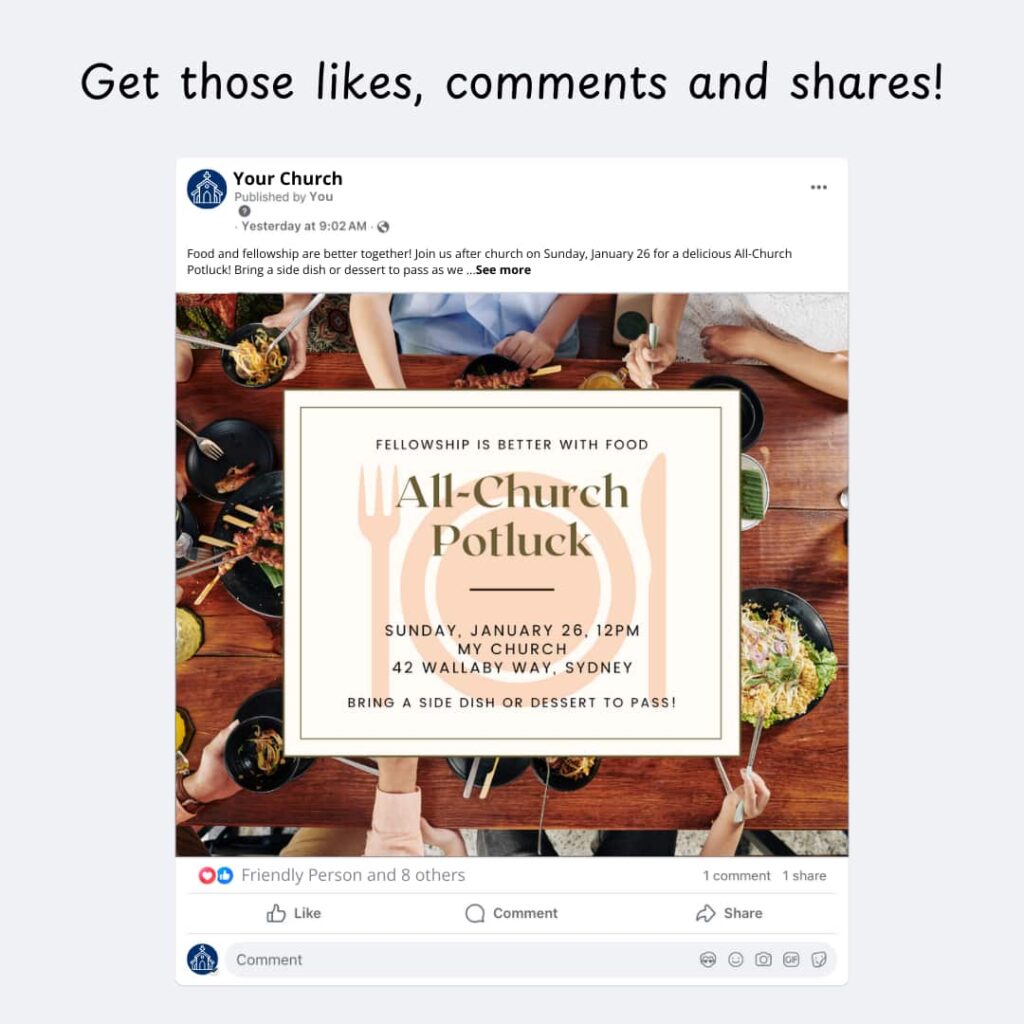
For our All-Church Potluck sample, making adjustments meant changing the background to something that gave a “sharing a meal” feel. We also added a little graphic behind the text to give a little pop of color! Of course, we changed the date, time, and location and added a little comment about bringing a dish to pass so that it actually matched the event. Then, we made sure everything was centered!

5. Get It Onto Social Media!
Once your design is ready, it’s time to share it with the world. The easiest way to do this is by downloading the design in the correct format (usually PNG for social media). Then, you can either post it immediately to your church’s social media page, or you can go into your business manager, where you have the option to schedule posts for later.
If you link your Canva account to your social media accounts, you can post directly from Canva. This feature is handy for scheduling posts, especially if you’re planning multiple announcements over time. For instance, you can create a week’s worth of content and schedule it to automatically post to your social media feed.
If you don’t have a Canva Pro account but you tried to include “pro” features in your design, you may get a warning telling you that you don’t have rights to something in your graphic. You have three options to rectify this:
- Change the image to one that doesn’t have a crown in the corner
- Purchase the rights to the element you want to use
- Set up your Canva Pro account (which is free for nonprofits) and get access to the whole library of elements.
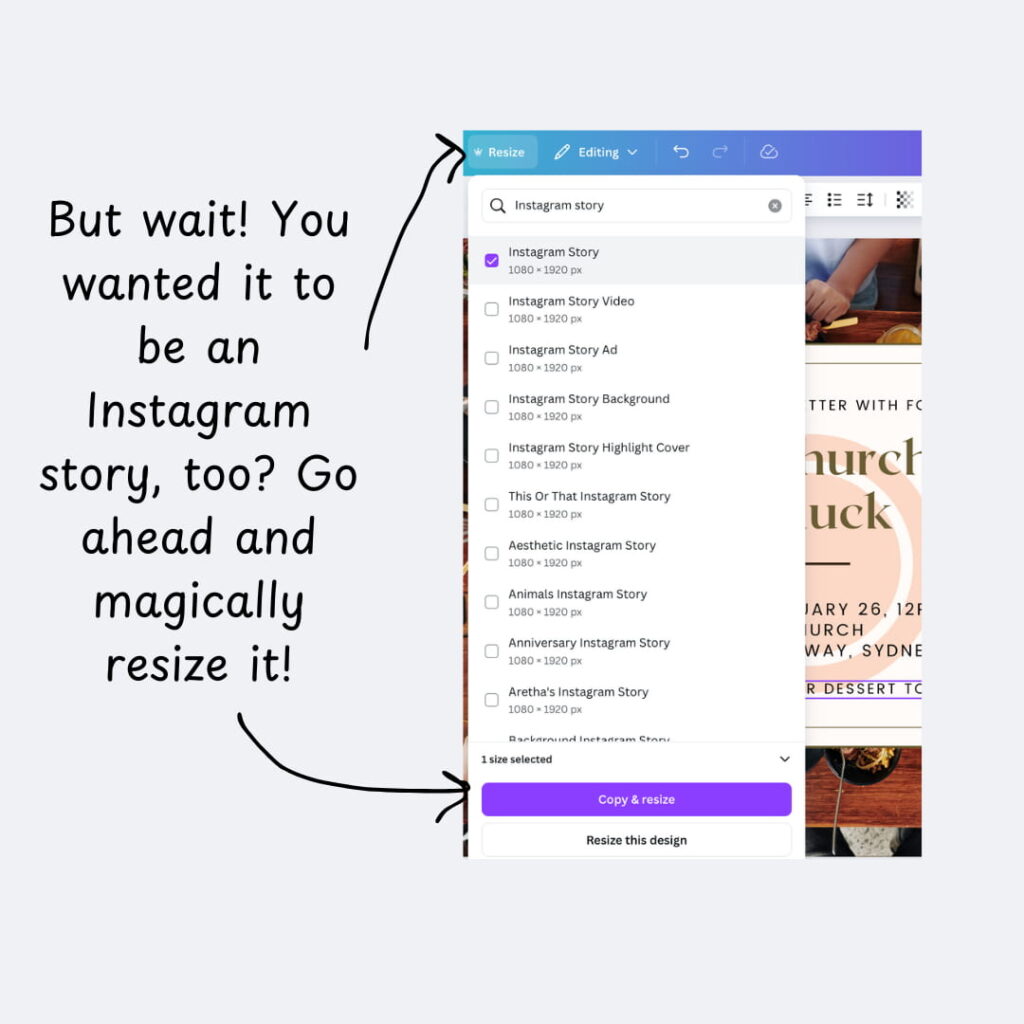
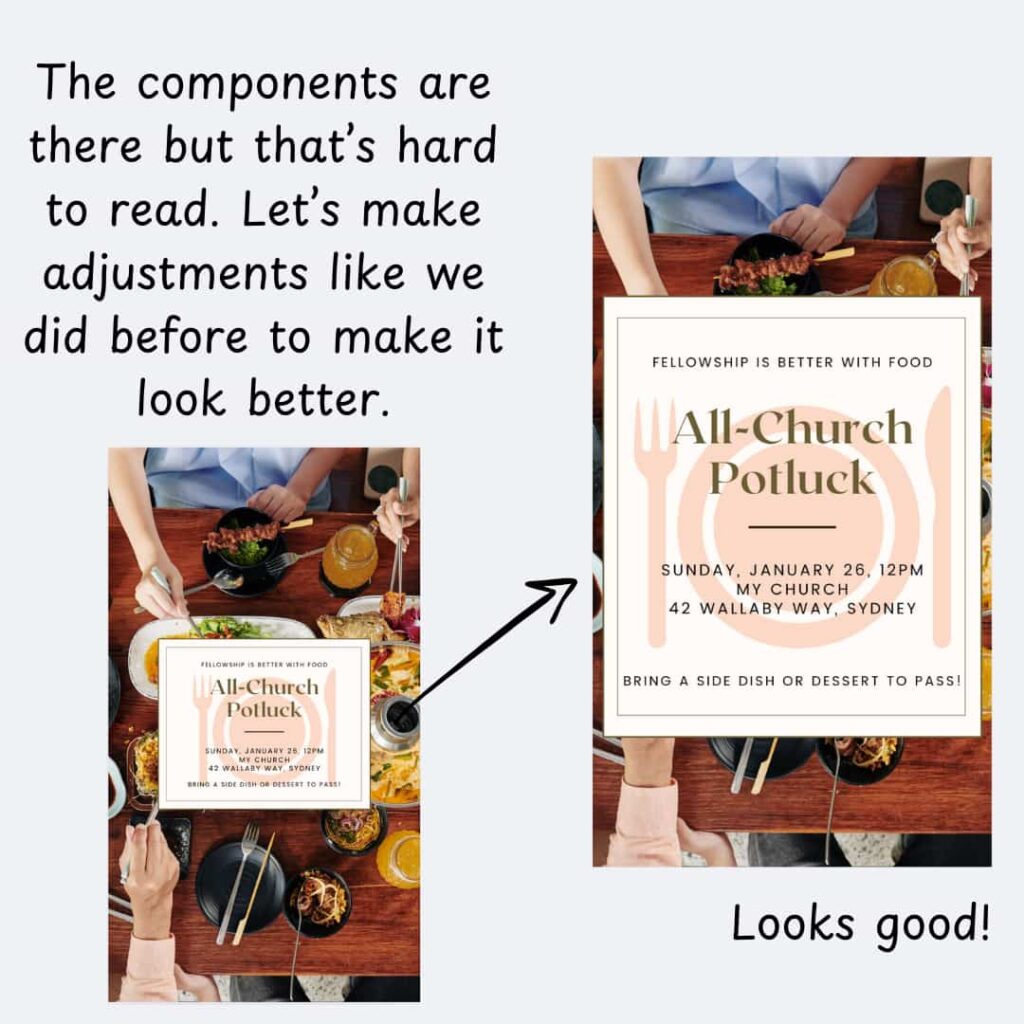
If you want to share this design on another platform (like, maybe as an Instagram story too), then you can use the resize button in the top left corner to do just that! You may need to make some adjustments, but all your elements should translate and you’ll just need a few minor tweaks.
Remember, as you make your social media post, you’ll want to include extra details in the text part of the post. You shouldn’t have included much beyond basic what, when, and where in the graphic, so you can share who it’s for, extra details, etc. in the post! You can also encourage engagement by asking a question or telling followers to tag a friend!
Give Yourself Time To Learn!
Designing social media content in Canva doesn’t have to be intimidating. By following these steps—choosing your design, exploring Canva’s features, and tailoring your template—you can create visually appealing graphics that enhance your church’s online presence. Once you’ve made the perfect design, getting it onto your social media feed and scheduling posts ensures your message reaches your audience effectively.
The learning curve may feel steep at first, but with time and practice, you’ll be creating professional-quality content that represents your church well. So grab a cup of coffee, open Canva, and start designing. You’ve got this!
Read More:
A Guide To Create And Design Church Bulletins In Canva
Canva: A Practical Guide Through What It Is And How To Use It


Thank you for this! How do you go about getting the pro free for church?
Visit https://www.canva.com/canva-for-nonprofits/ to start the process! You’ll need your church’s proof of nonprofit status from the IRS. If you’re part of a denomination and your nonprofit status is through them, you’ll need their determination letter and a letter affirming you’re part of their denomination. Sometimes Canva will reject your first request to be a nonprofit but you can resubmit and try again. I’ve heard their Facebook customer support is great, so you can always send them a message through Facebook if you’re still struggling to get approved.
Love all these tips. Would all this information happen to be complied in a pdf I could download as one document?
At this time, it isn’t in .pdf form. However, you can always bookmark this page and come back to it!
A suggestion for Carolyn Ramsey: Look for an Extension for your browser that will generate a print friendly pdf document from almost any web page. For Chrome/Google I have PrintFriendly installed.