
This post may contain affiliate links, which means I may earn a small commission from purchased products at no additional cost to you. See my full disclosure here.
Contents:
- Why Use Canva To Create Your Flyers For Your Next Event?
- Step-By-Step Guide
- Start A New Design
- Search The Templates
- Update The Details
- Make It Your Own
- Adjust Sizes And Alignment
- Download
- Share
- Resize And Share Again!
- Beginner Tips For Creating!
- The Beginning Of Your Graphic Designing Career
Congratulations! Your church has scheduled an event! Or maybe it’s starting a new group. Maybe you’re launching a new ministry! Whatever it is, it’s time to get the word out, isn’t it? Sure, you can have someone make an announcement from the pulpit, but some of us (myself included) need visual reminders. Some of us want to spread the word further than to those who were there on Sunday morning. Some of us need a flyer, so it’s time to head to Canva and get creating! Keep reading for some stress-free tips and a step-by-step guide on how to create church flyers in Canva that will help you get the word out!
Why Use Canva To Create Your Flyers For Your Next Event?
Canva makes it easy to create a well-designed flyer that is eye-catching, informative, and easily adapted to multiple sizes (because sometimes you need both a full-page flyer AND a half-sheet AND you want to share it on social media!)
You don’t have to have a degree in graphic design to make an event flyer that draws attention. You don’t have to spend hours creating something from scratch (that may or may not even look good depending on how design-savvy you are!).
Canva lets you take your own images and pair them with the wealth of visual elements available to create a flyer for your church event that you can feel excited about sharing both in the church and in the community.
Step-By-Step Guide On How To Create Church Flyers In Canva
1. Start A New Design
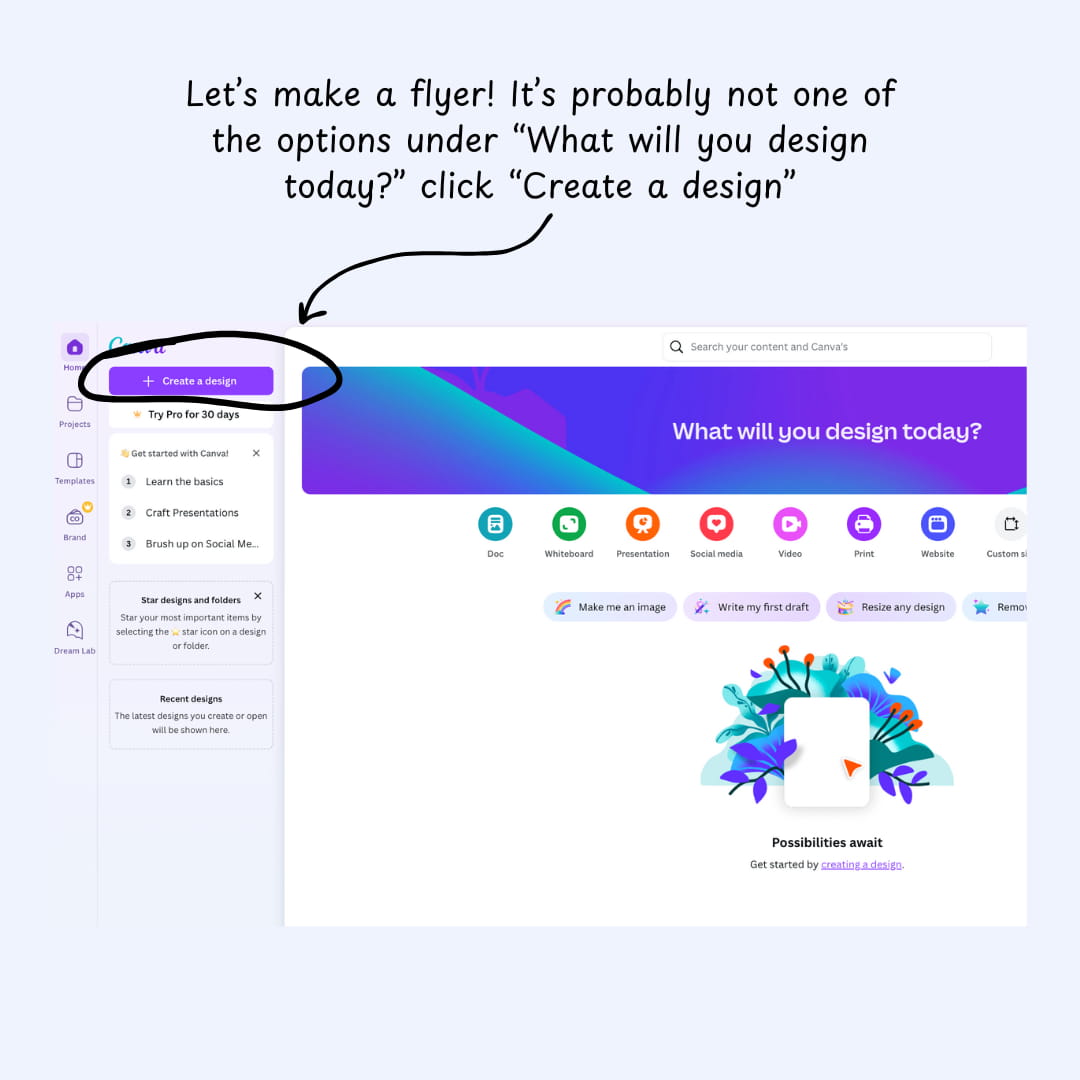
As soon as you open Canva, you’re going to be encouraged to start creating and Canva is going to give you options for what you can create! We already know that we want to make a flyer for our church, so we can click the button that says + Create a design and type flyer in the search bar.
You may feel overwhelmed by the options since you’ll see several different options for flyers of different sizes. You’ll also see a ton of options like Auction Flyer or Business Flyer. There isn’t anything special about these specific flyers, it’ll just show you the design templates that relate to that subject first. Choosing the generic “flyer” with the paper dimensions you want is totally fine.
A tip: When Canva lists the dimensions of your design, they always list the length first, then the height. If you’re ever unsure of which direction you’re choosing for the paper to go, you can use the image next to the option as a visual cue – it shows you if it’s going to be portrait or landscape.

2. Search The Templates
As soon as you open your design, you’ll be given a tab with suggestions for templates to use. Start here. There’s no need to reinvent the wheel – there may be a Canva flyer template that you really like, so you’ll only have minor tweaks to make! Canva boasts that they have over 450,000 templates, so chances are there’s a flyer template you can use.
You can scroll through the suggested templates, or you can type some keywords into the search bar to find a template that will fit your needs. I like to start more “granular” with my searches. If the event my church is hosting is a back-to-school bash, I’ll start by searching for back-to-school event. If I don’t like any of the options given to me on that narrow search, I can always pull back and search for school or community. Just remember that the broader the subject of the flyer, the more details you’ll likely have to update.

3. Update The Details
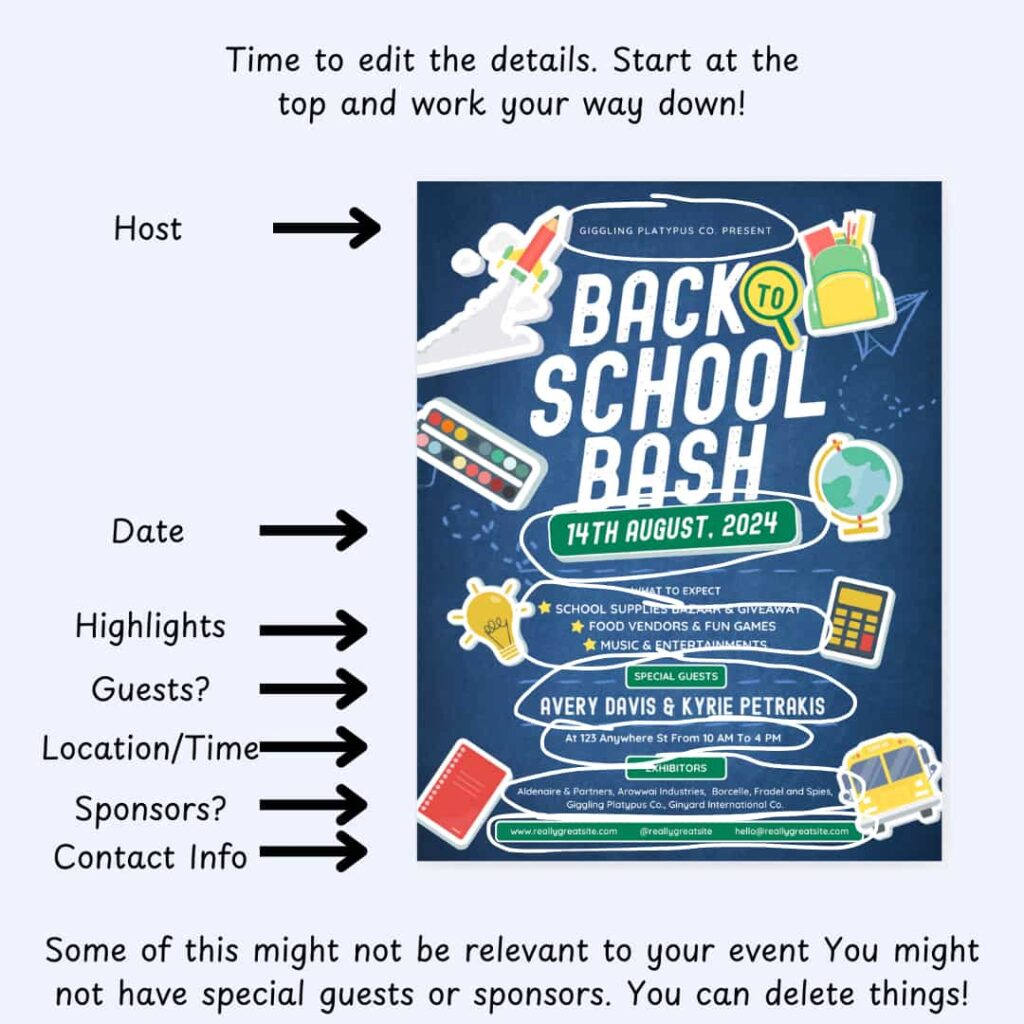
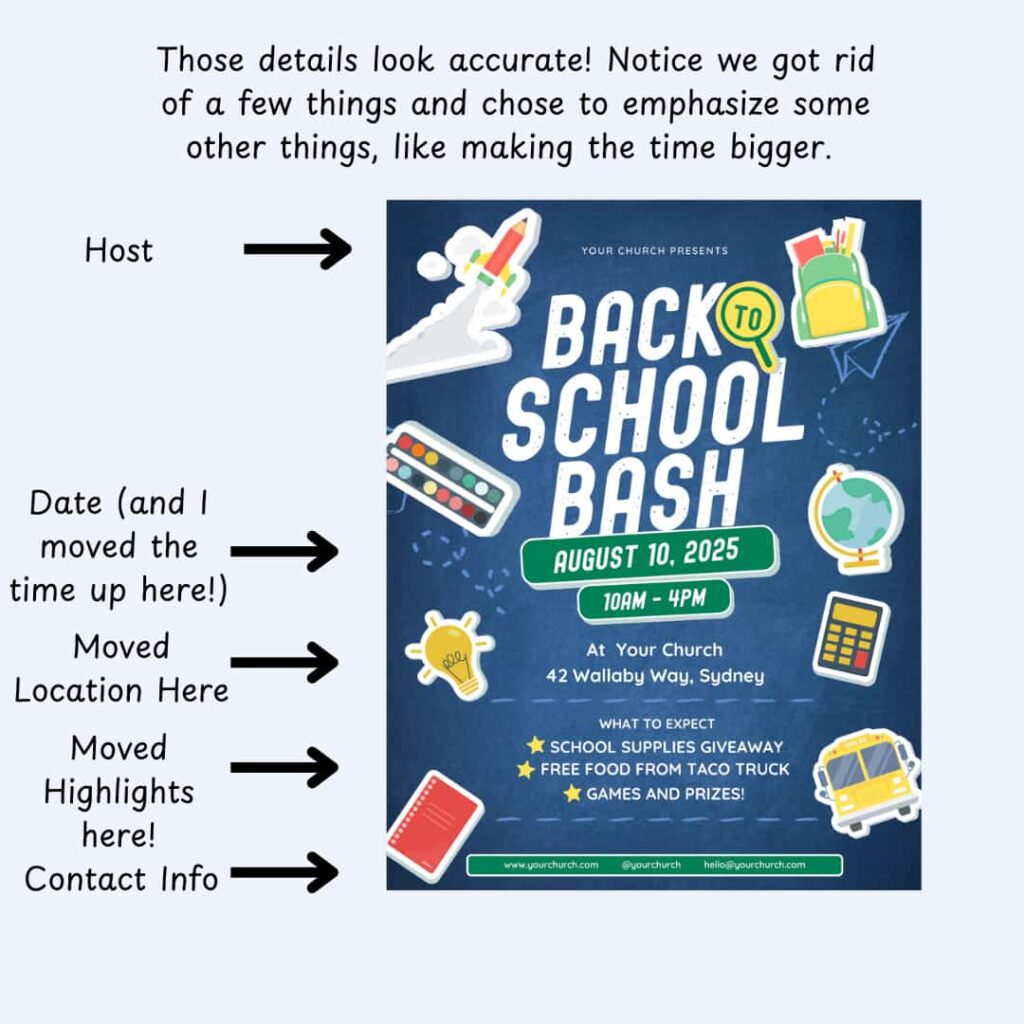
Once you’ve picked a template that suits your needs, it’s time to update the details. Chances are, your event isn’t happening at 123 Anywhere Street and your social media handle isn’t @reallygreatsite. In order to best ensure that you don’t miss a detail, start at the top of the flyer and work your way down the page.
Notice that (for most flyers), there isn’t an overwhelming amount of information. At most, you’ve got the date, time, location, and maybe a few key details. LESS IS MORE. If you put too much information on your flyer, then no one will read it because they won’t be able to absorb the information quickly.
If you’re finding that there are more details that you need to include, then you may need to direct them somewhere to get more information. If you’re tech-savvy, you can create a page on your church website (especially for those bigger community-oriented events like VBS or Christmas/Easter) so that you can share details and answer questions. If creating a web page is out of the question but you have access to your church’s social media page, you can encourage people to find out more by visiting your Facebook page for details. You can even include a QR code that people can scan with their phone’s camera to make it even easier for them to get information.
4. Make It Your Own
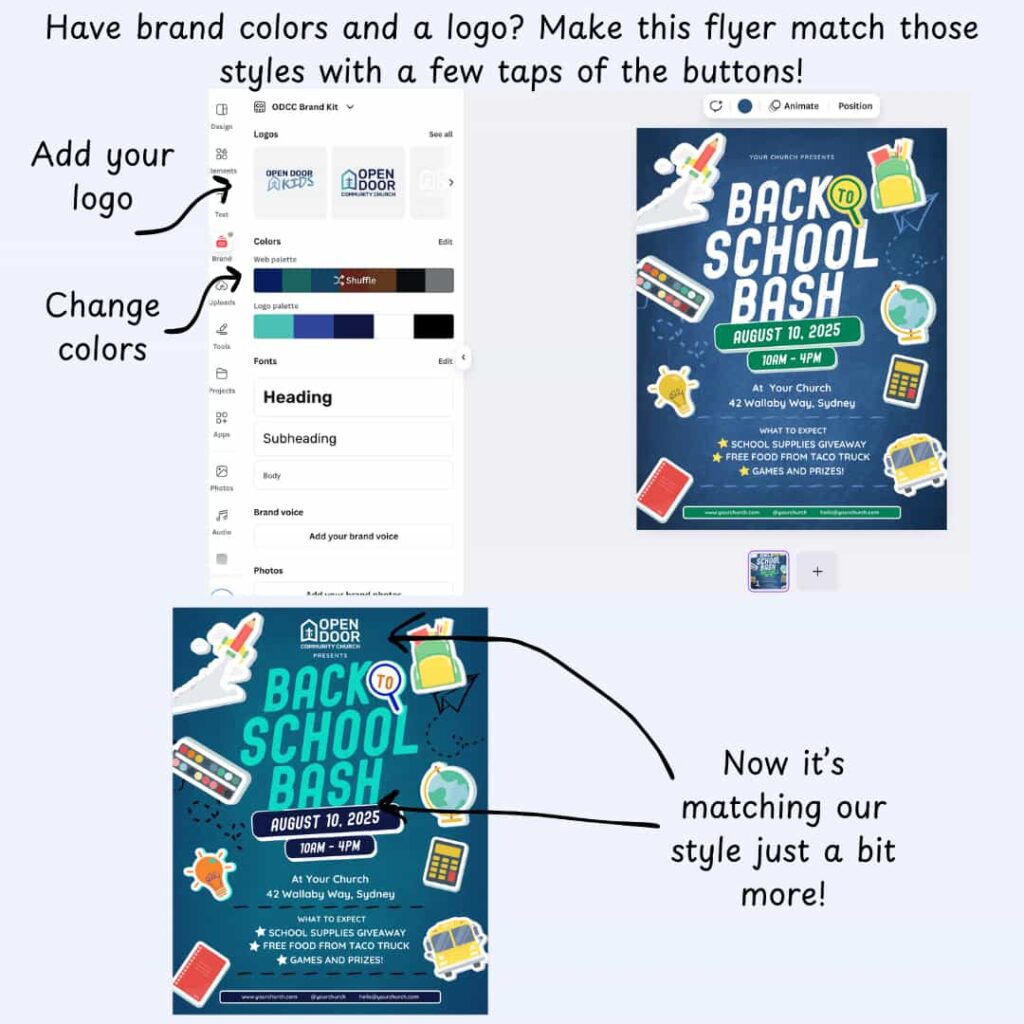
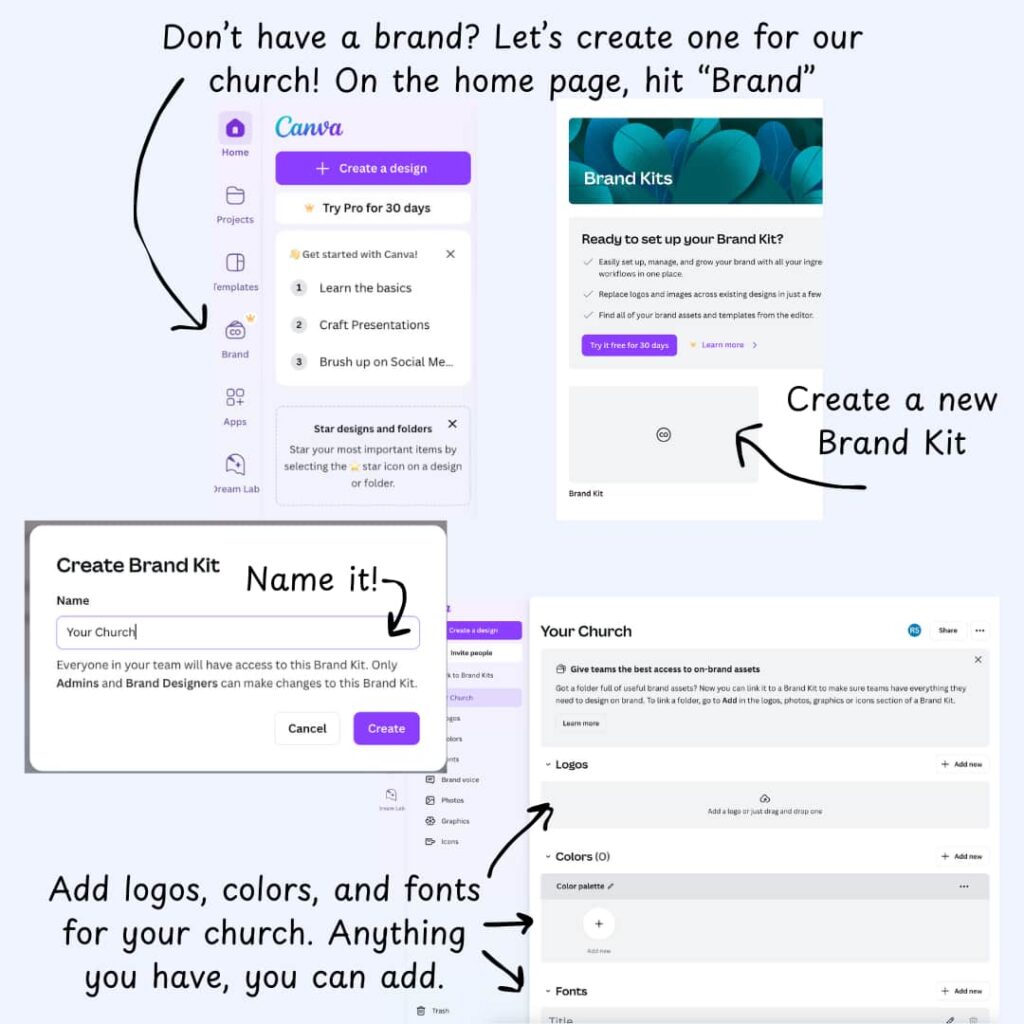
If your church already has a logo, colors, and/or font that they use consistently across designs (think graphics for social media, your bulletin, letterhead, etc.), then great! You can use that in Canva by creating a “Brand Kit.” On the home page for Canva, click Brand, then Brand Kit then create a new Brand Kit. Add any logos you have, and brand colors you use consistently, and any fonts. These are all accessible in every design you make in Canva so that you can use the same colors, fonts, etc. every time you create something.
If you just read that paragraph and have no idea what I’m talking about or you feel really behind because your church doesn’t have those things, it’s okay! It can be a goal that you work towards, but not a requirement for creation. When you use consistent colors, have one logo, and one or two fonts that you use consistently, this allows you to build “brand awareness” for your church.
Basically, it lets people realize they’ve seen your church before because they can connect a new flyer to one they’ve seen before or something they saw on social media. (For example, everyone knows which fast food restaurant I’m talking about when I refer to Golden Arches because we’re aware of their brand).
Branding for churches is not a requirement, but it can be helpful (it also makes it faster to make things feel consistent when you use the brand kit because you can tell Canva to change all the colors to match your brand in the click of a button).
Whether you have a “brand” or not, you can still make this flyer your own by adding graphics, changing colors, adjusting text and spacing, etc. Feel free to add a text box or graphic if there is more that you want to add. Feel free to remove a text box or graphic if there’s too much information or something on the flyer template that isn’t helpful to you. Just remember, if you’re adding things, that less is more and you don’t have to have every minuscule detail lined out – just the highlights!
5. Adjust Sizes And Alignment
Think about where people are going to be seeing your flyer. If it’s going to be hung on a wall or bulletin board, you need to make sure there is text that’s big enough and readable enough to be seen from a distance. If it’s going to be put directly in people’s hands, you need to make sure there is text that’s big enough and readable enough to catch the eye. If you’re mailing it, you need to make sure there is text that’s big enough and readable enough so that people don’t throw it away as soon as they get it. See a pattern here? A good font size and readability are KEY.
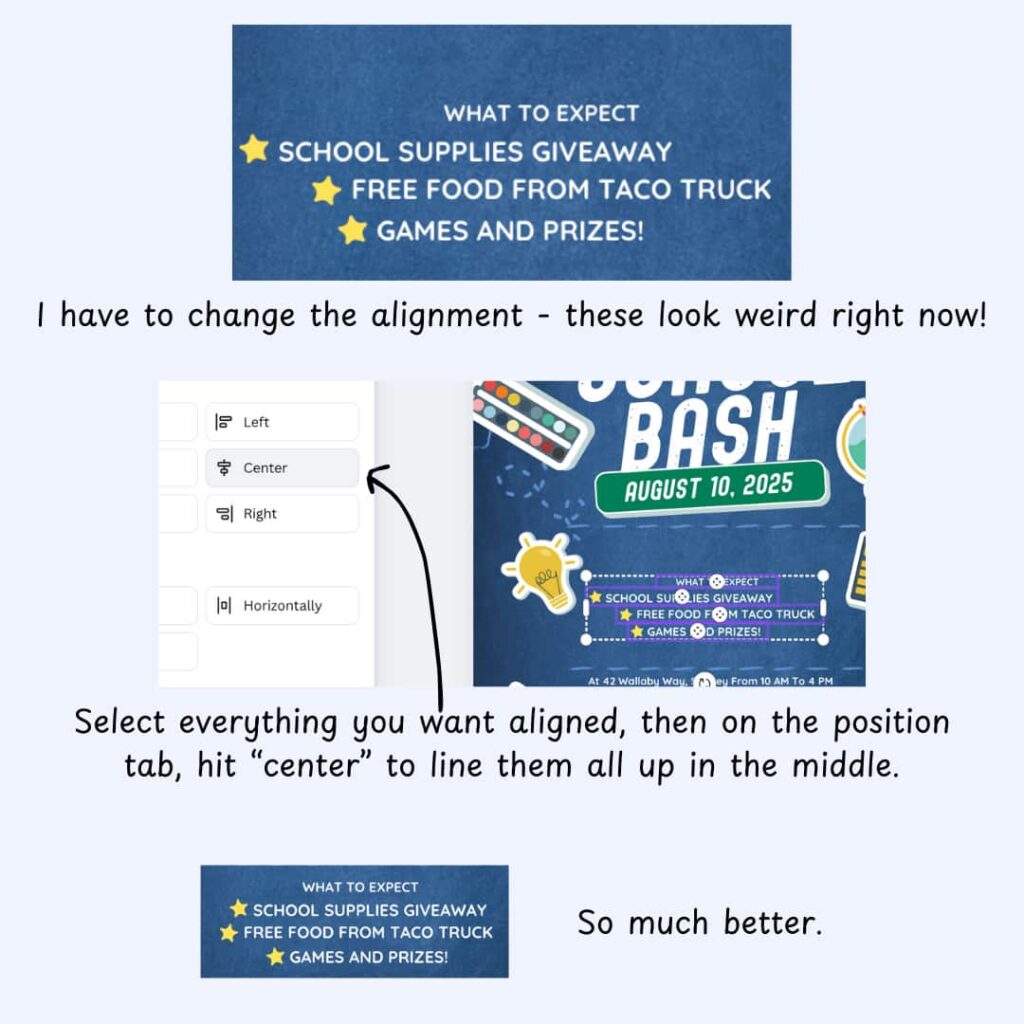
It’s also important to line things up appropriately – what might look straight and aligned to the naked eye could actually be a tiny bit misaligned (which may not seem like a big deal, but if you’ve ever looked at an advertisement and got the feeling something wasn’t *quite* right but couldn’t put your finger on it, misalignment might be the problem. Thankfully, Canva makes it really easy to get things lined up a few different ways.
You can manually align things using Canvas’s drag feature. When you drag an object, you’ll either see a dotted line appear when it’s lined up with another object, or you’ll see a solid line appear if it’s lined up with the middle of the page.
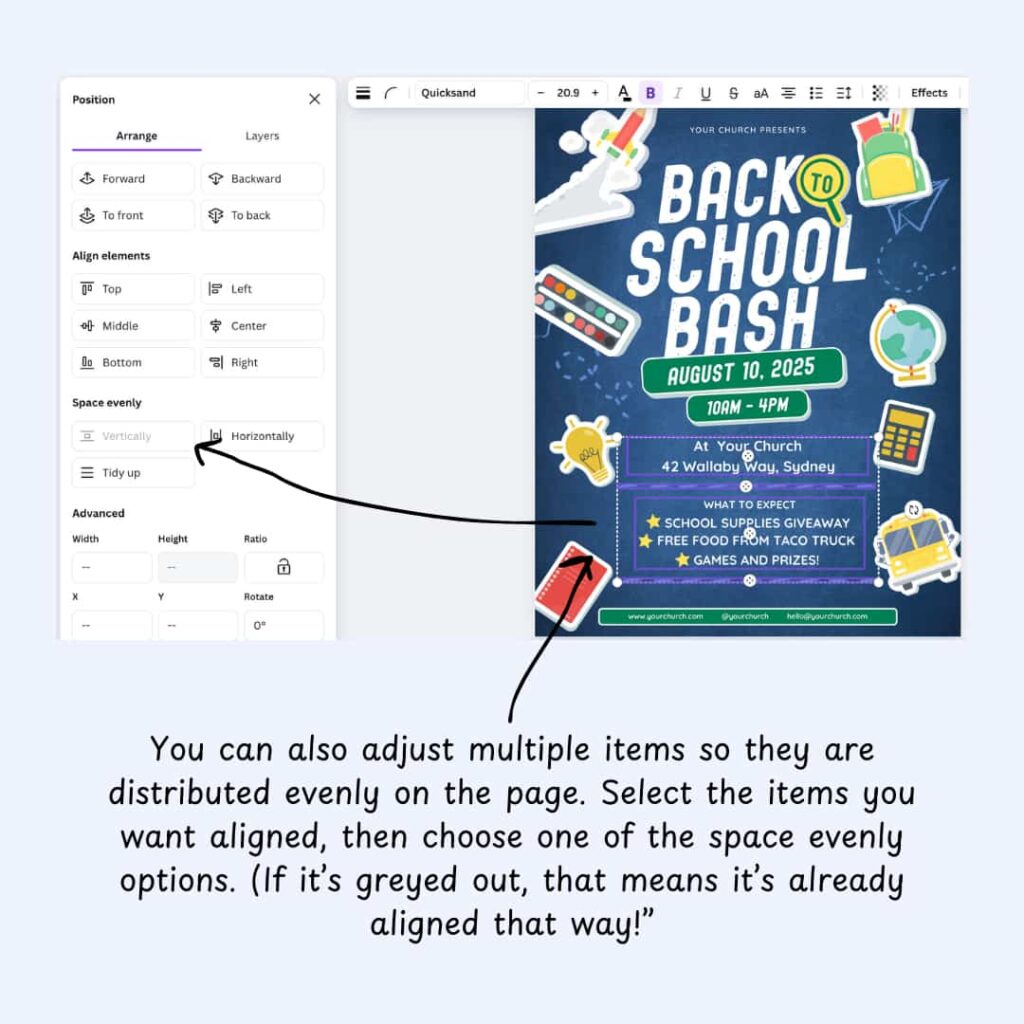
You can also line up multiple features with one click! Again, you can use Canvas’s drag to select multiple items at once, or you can click one at a time while holding down the shift key on your keyboard. Either way, once you have more than one item selected, you can click the position tab and align them to the middle of each other or the left/right sides. You can also distribute items vertically or horizontally so that there is even spacing between each object.
6. Download
Once you’re satisfied with the information, the font, the text, the colors, extra graphics, etc., it’s time to download your work! Or, if you aren’t quite satisfied but don’t know what to change, maybe it’s also time to download it! Why? Sometimes, seeing the final product (or draft 1 of the final product) may help you see if there’s anything you need to change. In the top right corner of Canva, you’ll see the Share button, and then once you click on that, select Download.
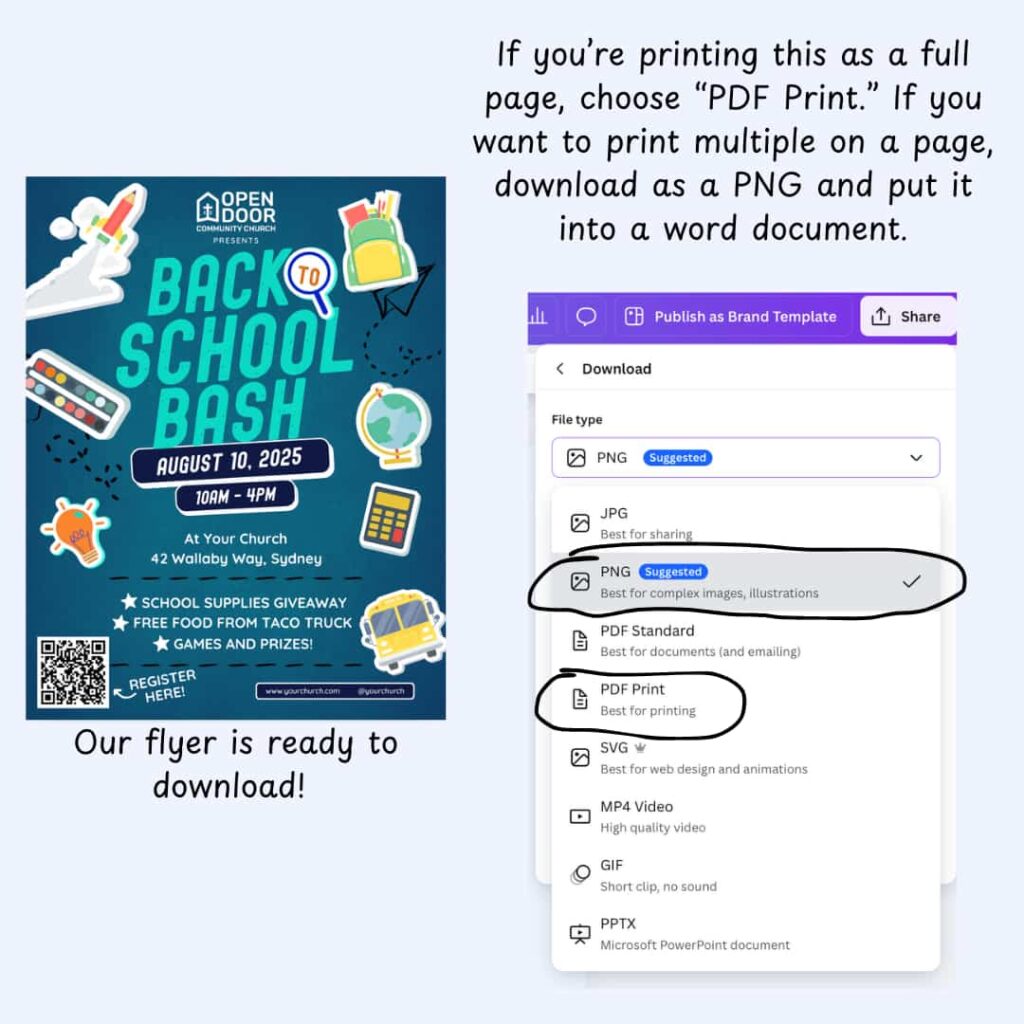
You may feel overwhelmed to see that there are multiple options for file type. Here’s a few suggestions for what to choose if you’re printing the image yourself:
- Full-page flyer – You can download it as a PDF Print.
- Half-page flyer or smaller, intend to print more than one flyer per page – Download it as a PNG file. Once you’ve downloaded that image, you can insert it into a word document so that you can put more than one image on the page before you print.
- Remember: Printers cannot print all the way to the edge of the paper, so you’ll have about .25 inches on every side of white space on each side of the paper.
If you’re planning on sending this flyer to a professional printer to print for you, contact them and ask which file type they’d prefer (or just send them both the PDF Print and PNG file so your bases are covered).
Before printing 100+ copies, ALWAYS print out a test copy. Printing one copy and seeing it on paper may help you realize you need to make some changes – the font size may not be big enough, the colors don’t mesh well in real life, it feels too overwhelming, or something else.
Again, you’ll also notice that there’s going to be a white border around the whole paper because printers cannot print completely to the edge – if you’re trying to put multiple flyers on one page (such as 2 half-sheet flyers), printing a test copy will allow you to see if you need to adjust anything so that border looks equal around the whole half-sheet flyer when you cut them apart.
7. Share
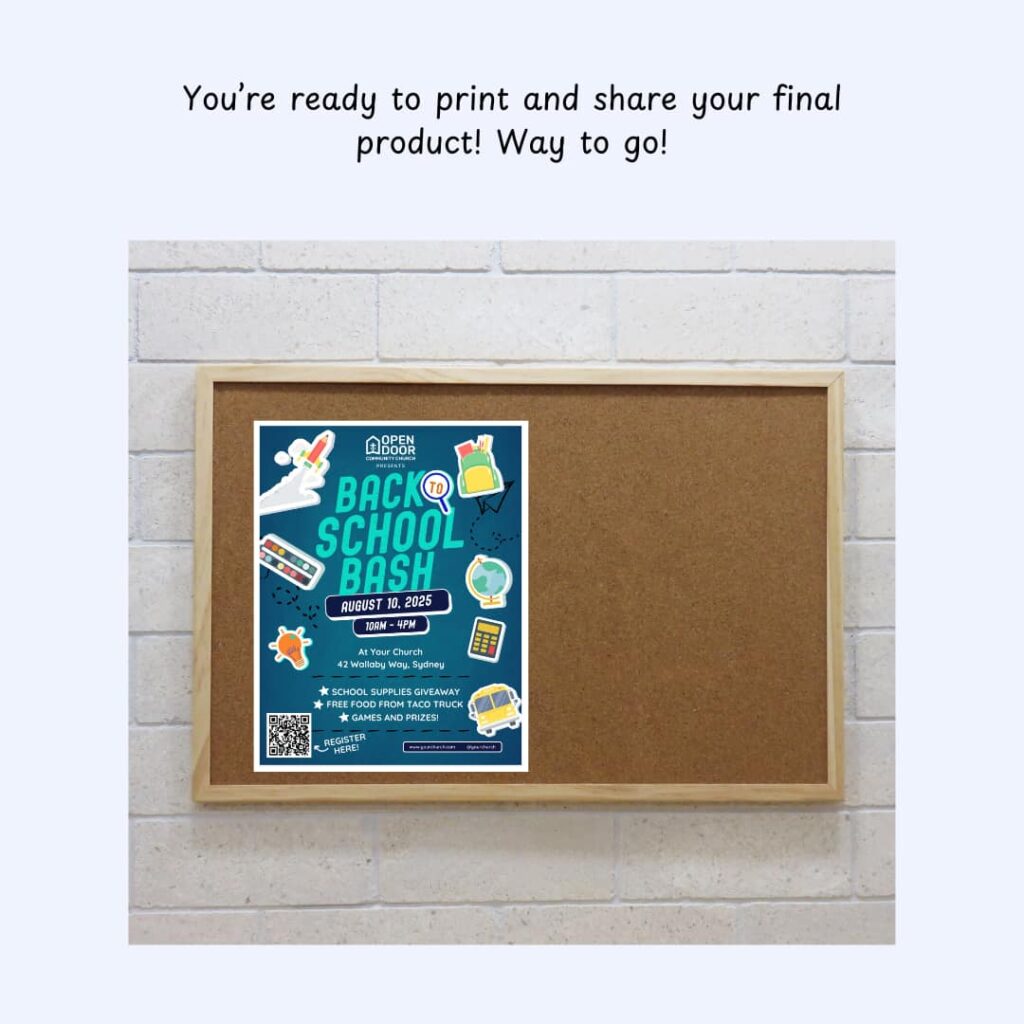
Once you’ve printed a test copy, looked it over, and made any changes you think you need to, it’s time to share your flyer! Remember, if you’ve made any adjustments after your first test copy, print another test copy to ensure you’re satisfied with those changes. It may feel like a waste of trees, but it’s better to make adjustments now than have to print them ALL again.
Before you share it with the public, you can also share that test copy with someone else in order to get their feedback, too. This is helpful because something may stick out to them that you didn’t even notice. (Check out beginner tips below about sharing with someone ON Canva if you’d like others to weigh in before you even print it).
Again, once you’re satisfied and have printed your test copy, go ahead and share it with the world (or, you know, your community)! Print out however many copies you need and distribute it! Well done on making your Canva flyer!
8. (Optional) Resize And Share Again!
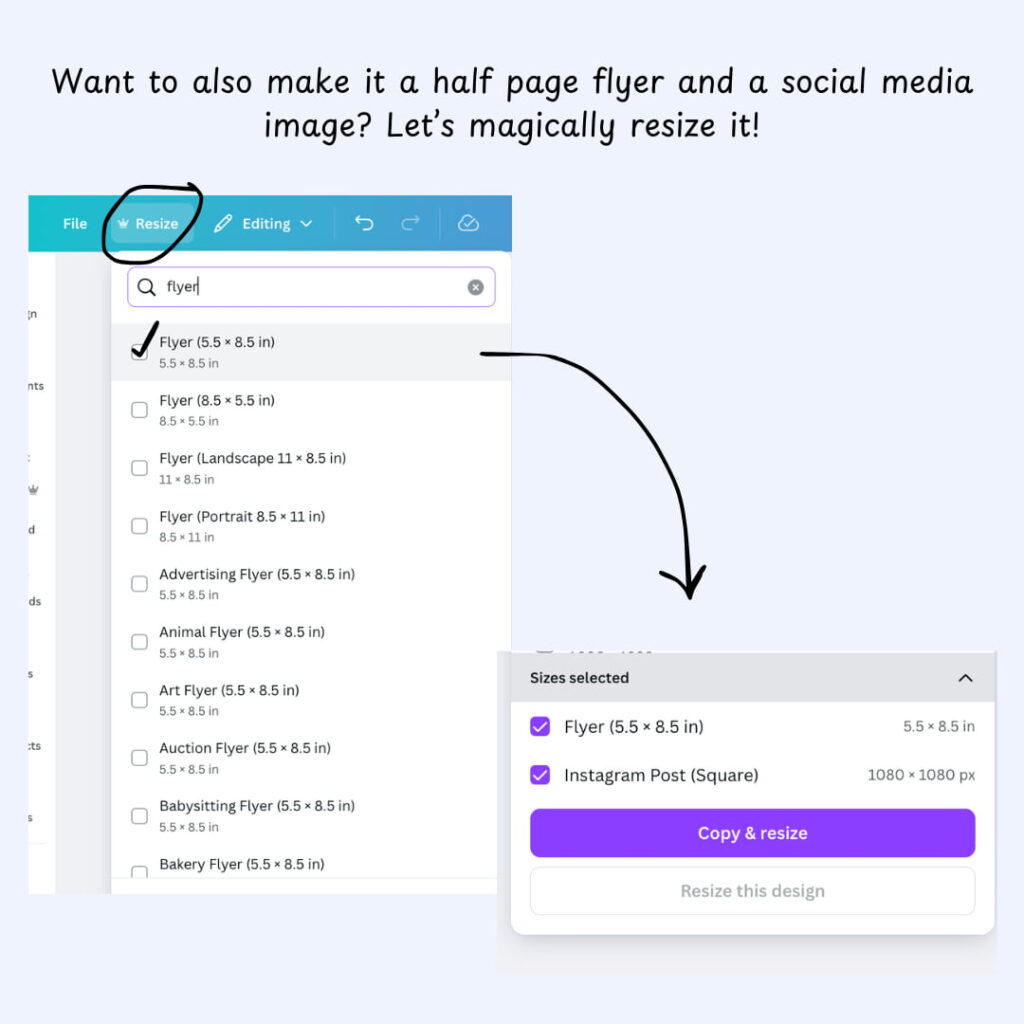
If you need to share this flyer in a few different formats, Canva makes it easy to resize. Maybe you created a full-size flyer to hang on a community board, but you also want to hand out a half-sheet flyer and make a Facebook post.
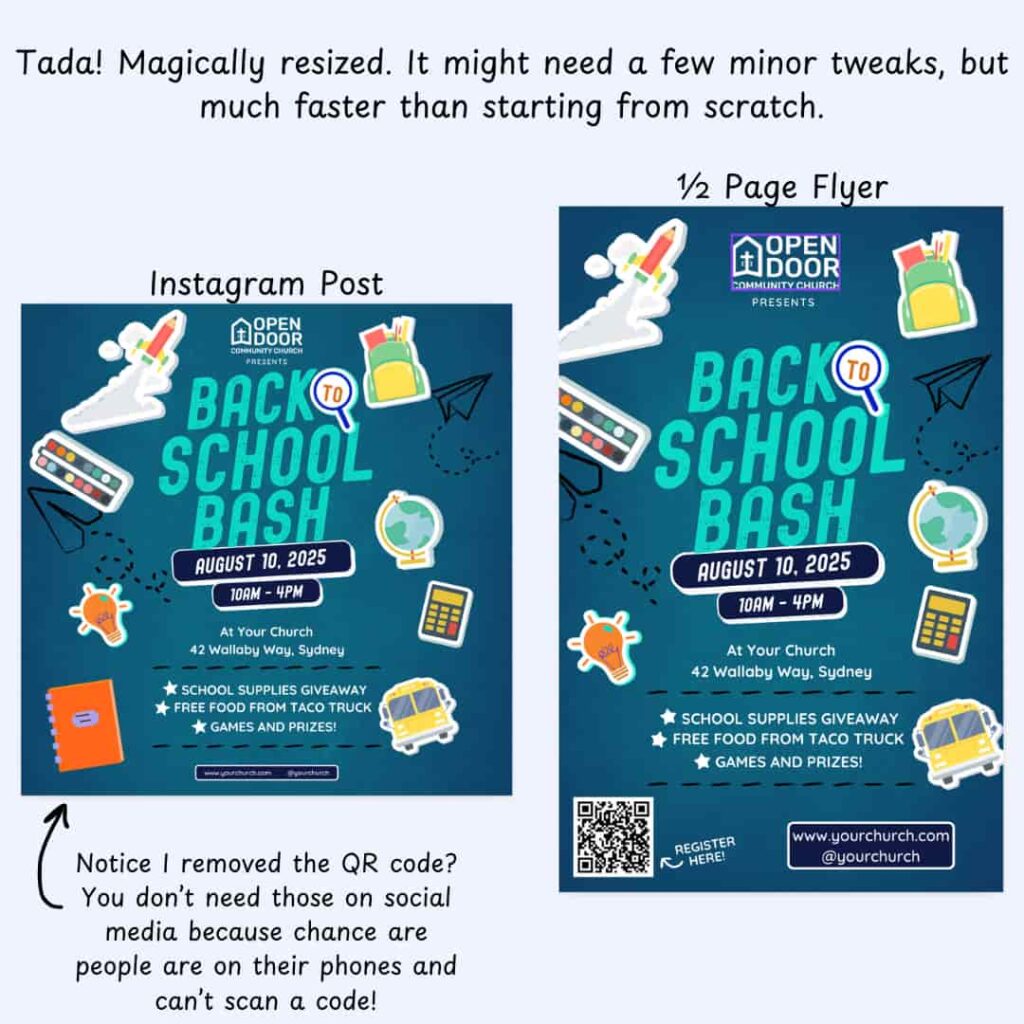
If you have Canva Pro account (which is free for nonprofits, which most churches are!), you can resize to different sizes at the click of a button (the Resize one – seems appropriate, no?). Select the new sizes you want to put your flyer into and hit Copy and Resize – Canvas will magically adjust everything for you. You might need to make minor adjustments, but these shouldn’t take long. Then, you’ll be ready to download and share again!
Beginner Tips For Creating!
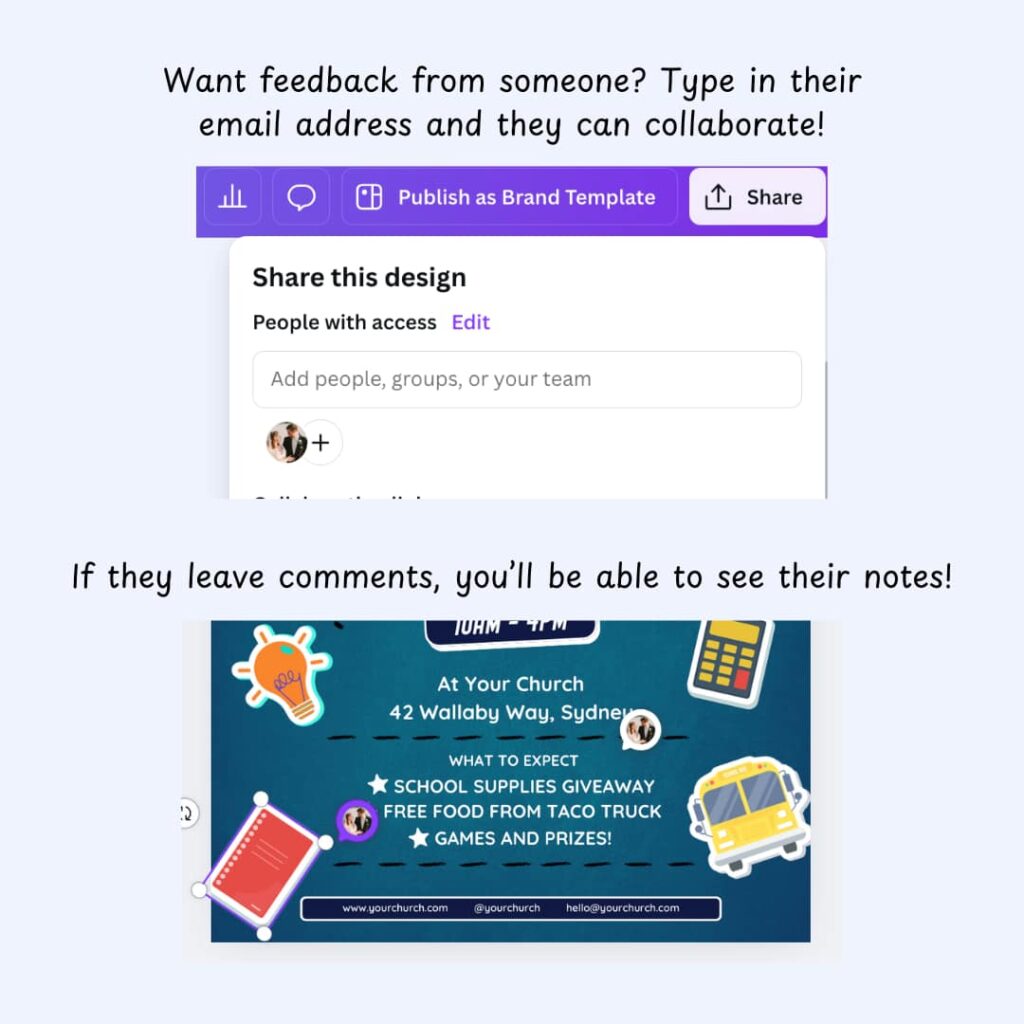
Starting out, it can be tough to know if what you’re making actually looks good! If you want help creating a flyer or you’d like someone else in your church to critique your flyer design, you can easily share that flyer with someone else in the church. All you need is their email, and you can invite them to your team! With Canva Pro, you can have up to 50 team members on your church’s account without having to pay anything extra for them to get access to Canvas library of design elements.
If you only want them to help you with the one design, all you have to do is click “share” and type in their email. If you’d like to invite them to your “team” so you can share things with them later, Canva gives you that option, too!

Remember, less is more when it comes to any visual creations. Keep the flyer’s information to just what, when, where, and any *basic* details. The flyer should not be overrun with every little thing – if it’s important for people to know more, then direct them to a web page or your Facebook page. You can add a QR code (search QR code in the Apps tab on the left side and use the first one that pops up) to make it that much easier for people to find more information. QR codes are also good if you want people to reserve or purchase tickets.
Don’t be afraid to make a few different versions of your first flyer. Sometimes, the first one is not a winner, but you need something to get the creative juices flowing. It’s also okay to get feedback and take direction – it’s not a reflection on your skill, it’s a reflection on your desire to learn!
The Beginning Of Your Graphic Designing Career
Canva makes it so easy to make flyers that are eye-catching and don’t take much time to make. If you want to get the word out about your next community event but don’t have a graphic designer on staff and time is short, Canva is your best friend! Don’t be afraid to play with Canva’s wealth of resources as you build your flyer from their library of templates.
Take that template, put in your details, then make it yours – whether that means adding your church’s brand to it, or just tweaking the flyer so it looks and feels like your church. Make sure fonts are readable and big enough and don’t overload the flyer with too much information. It’s okay to ask for help and feedback before you print 100+ copies of that flyer! You’ll be feeling like a graphic designer in no time! Happy creating!
Read More:
Canva: A Practical Guide Through What It Is And How To Use It

