
This post may contain affiliate links, which means I may earn a small commission from purchased products at no additional cost to you. See my full disclosure here.
These four Father’s Day crafts have you covered from the littlest of hands all the way through older elementary. Perfect for small churches, each can be made in one class session and handed to a special dad, grandpa, mentor, or friend that very same day.
If you have a mixed-age class, encourage the older to help the younger, but don’t forget to leave them time to make their own special creation too.
Low-Cost Homemade Father’s Day Crafts That Won’t Break Your Budget
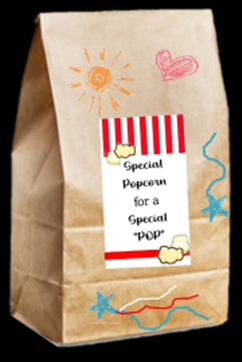
1. Special Popcorn For A Special ‘POP’
This is a simple recipe but one that’s sure to make an impression on that special man in your life. I mean popcorn, peanuts, and pretzels –– what more could they want?
Materials List:
- Quart-sized baggies to place the finished popcorn in
- Brown lunch sacks or brown craft gift bags to decorate
- Stickers (printed on the computer or hand drawn) for the sacks
- Ingredients for the popcorn mix
Decorate Bags
- Make your labels to place on the front of the lunch sacks: Special Popcorn for a Special ‘Pop’! (you could also do one for a Grand-‘Pop’)
- Then, decorate the bags with markers, stickers, crayons, or whatever you would like. Make it festive!
- Set aside.

Recipe Ingredients:
- 8 cups of air-popped popcorn (purchased or made)
- 3 cups of small pretzels
- 3 cups of Honey Nut Cheerios
- 2 cups of peanut M&M’s & 2 cups of plain M&M’s
- 1 bag of mini marshmallows (10 oz)
- 1/2 cup (or 1 stick) of salted butter
- 1 cup of brown sugar
- 1/3 cup of peanut butter (smooth)
- 1 tsp. of vanilla
Instructions
**Prepare 2 large cookie sheets with wax paper to pour your finished mix on**
- Have an extra-large bowl available for mixing (I find my punch bowl works great).
- Place the popcorn, pretzels, cereal, and candies in the extra-large bowl and stir to mix.
- In a separate large glass/pyrex-type bowl, place the butter, peanut butter, and sugar in, then microwave for 1 minute. Stir.
- Place mini-marshmallows in the mixture and stir to coat. Place the bowl back in the microwave and cook for 2 minutes. **Remember the bowl will be hot, so have oven mitts of potholders ready to take it out of the microwave.**
- Stir the mixture, making sure all the marshmallows are melted down and incorporated into the mixture. Then add the tsp. of vanilla and stir.
- Now pour the melted marshmallow mixture onto the popcorn mix and stir with a large spoon until everything is lightly coated. Yes, it will be sticky!
- Dump the mixture onto the cookie sheets spreading it out into a single layer. Let the popcorn sit and cool for about 2 hours (you can place it in the refrigerator if desired, but not necessary).
- After the popcorn is cooled (it will be slightly sticky with a bit of gooey goodness, but that’s what you want!!), place the mix in bags. Then place the baggies in the decorated lunch sacks.
- Finally, deliver with a hug, a smile, and a card!!
Helpful Hints:
- This popcorn stays fresh in a zippered bag for about 3 days, but we know it won’t last that long!!
- For Sunday school, make the popcorn mix earlier in the day or the day before. During class, the kids will decorate and then fill the bags.
- Make extra for the children who have pop-pops or grandfathers they want to make a bag for.
Bonus idea: Make extra for the kids to hand out to each father at the end of your church service, including all dads, even those whose children are grown up.
2. Key Holder Plaque
The perfect Father’s Day craft and a great place for dad to hang his keys and put his phone or wallet. A practical gift that he can use!
All materials for this project are available at most dollar stores.

Materials List:
- Mini wood crate (5 ½ in. long by 2 ½ in. deep by 3 in. wide)
- Unfinished wooden square plaque (5 ½ in. by 5 ½ in.)
- 3-metal cup hooks
- 1 chalkboard tag
- Acrylic paint & brushes
- Wood glue, craft glue, and items to decorate the box as desired
Instructions
- Paint the wood plaque and the mini crate in desired colors of acrylic paint. Set aside to dry.
- Use a white paint marker or sharpie and put the sign on the chalkboard tag.
- Once the plaque and mini crate are dry, glue the chalkboard tag to the plaque.
- Screw the 3-cup hooks in the wood plaque beneath the chalkboard tag (grown-up help needed).
- With the wood glue (or hot glue), attach the wood plaque to the mini crate (use a piece of painter’s tape to hold it together while it dries).
- Decorate the front of the crate with whatever you like. In the sample, we used some jute twine glued across the front, but you can use stickers, paint markers, buttons, or decorative stones.
*Once the project is dry, make sure you sign your name on the back with the date! Put it in a gift bag and make a special delivery to a special guy.
Helpful Hint:
If you have a shorter Sunday school time, complete steps 1 & 2 the week before Father’s Day so it has plenty of time to dry. Finish the project next week.
3. Pallet Style Coasters
Coasters are always a practical gift and save our furniture from wear and tear. Here are some easy coasters to make with the look of a wooden pallet. Made from economical popsicle/craft sticks, this one is simple and fun! You can also customize them with color and sayings for whomever you are gifting them to.

Materials List:
- Standard wooden popsicle sticks (available at craft stores or Dollar Tree)
- Craft glue or hot glue
- Clippers or wire cutters to snip ends of popsicle sticks
- Acrylic paint and brushes
- Sharpie permanent markers to write on the pallets
- Jute twine to bundle coasters together
Instructions
- For a set of 4 coasters, assemble the cross beams. You will need 2 per coaster, equaling 8 total (each cross beam is made of a stack of 3 popsicle sticks glued together, trimmed at the ends with a clipper).
- Take 10 popsicle sticks and place them to form a coaster. Make sure tops and bottoms are even. We used a ruler to place the sticks up against so it would be even.
- Glue your cross beams on top of the 10 popsicle sticks (in the opposite direction so that it touches each of the sticks). Glue the cross beam ½ inch in from the bottom edge of the 10-stick square and then glue the other crossbeam ½ inch in from the top edge.
- Then, put glue on the top sides of the cross beams and place it on top of the other square of 10 popsicle sticks. **If you use craft glue, you will need to let it dry in between gluing. Hot glue will let you move on immediately, but you will need adult supervision for a hot glue gun.**
- Continue piecing and gluing together the other pallet coasters.
- Then, once they are constructed and the glue is dry, paint with your desired colors. You can mix and match or have them all the same. It’s your art, have fun with it!!
- Once the paint is dry, finish the coasters off with a personalized touch. Then use the sharpie marker or paint marker to add some phrases, names, or even a verse!
- Use the jute twine, tie the pallet coasters together, and wrap them up!
- Deliver them perhaps with a favorite beverage attached.
Helpful Hints:
- If your Sunday school time is short, do steps 1-5 the week before Father’s Day.
- For younger children, consider using stickers instead of paint to decorate.
4. We’re ‘Nuts’ About You Jar!
Many of our favorite men love to munch on nuts … so let’s make a special jar to stash them in that has a real ‘nutty’ twist! Make sure to check on nut allergies before gifting someone with this present.

Materials List:
- One mason jar (16 oz.)
- Pieces of colored duct tape
- Wood chalkboard tag (There were 3 in the pkg. that we used for the key holder, so we used one of those.)
- White sharpie or paint marker
- Misc. metal nuts, different sizes (from the hardware store)
- Jute twine for decoration
- E-6000 or Gorilla Glue, and craft glue
- Edible nuts to fill the jar with
Instructions
- Make sure to wash and dry the mason jar. Take off the jar lid and circle the ring.
- Use the jute twine and wind it around the circle ring. Then use glue underneath to secure it in place.
- Place some duct tape on the lid for some color and set aside the cover.
- Use duct tape to make a band around the center of the jar.
- Write on the chalkboard tag with the white sharpie: NUTS about Dad. Then glue the tag onto the front center of the jar.
- Use the E-6000 or Gorilla Glue and attach the metal ‘nuts’ around the jar in a random pattern.
- That’s all there is to it! Get your edible nuts and place them in the jar. (We layered peanuts and cashews in our jar.)
- Then, once the jar is full of your goodies, put the decorative lid & rim on the jar and place it in a gift bag surrounded by tissue paper to protect it!
- Deliver your gift and make sure you tell the recipient that you are ‘nuts’ about them!!
Handmade Gifts Are The Best!
Handmade gifts are fun and are always so memorable for those who receive them. If you make one or more of these projects, post a photo on our Creative Solutions for Small Churches Facebook community –– we’d love to see them!
Happy crafting and happy Father’s Day!
Check out this article for a photo booth idea and other great ways your church can celebrate all your dads!
Read More
10 Low-Cost Ideas For Father’s Day
A Cheap & Easy Option For Your Small Church KidMin Curriculum